
Apache Kafka is a distributed messaging system that allows applications to handle real-time data streams effectively. Whether you’re new to Kafka or looking to refine your understanding, this guide dives deep into its core components, key terminology, and practical implementation using Spring Boot.
Table of Contents
Apache Kafka is an open-source distributed event-streaming platform. Designed to handle high-throughput, low-latency data streams, Kafka is widely used for real-time data pipelines, event-driven systems, and stream processing.
Key Features of Kafka
- Distributed Architecture: Ensures scalability and fault tolerance.
- Durable Storage: Messages are stored persistently until consumed.
- High Throughput: Capable of processing millions of messages per second.
- Decoupled Systems: Producers and consumers operate independently.
- Partitioning: Messages within a topic are split across partitions to improve scalability.
- Broker A broker is a Kafka server responsible for storing and managing data streams.
- Zookeeper Zookeeper is used to manage and coordinate Kafka brokers. It handles tasks such as leader election and metadata storage.
- Topic A category to which messages are sent by producers and consumed by consumers. Each topic can have multiple partitions.
- Partition Topics are divided into partitions for scalability. Each partition is an append-only log file.
- Replication Factor The replication factor in Kafka determines the number of copies of a partition’s data that are maintained across Kafka brokers. This feature ensures fault tolerance and high availability, as the loss of a broker does not result in data loss..
- Producer Producers send messages to Kafka topics.
- Consumer Consumers subscribe to topics and process incoming messages.
- Consumer Group Consumers within the same group share the responsibility of processing messages, ensuring each message is processed only once.
- Offset Kafka tracks the position of a message in a partition using an offset.
How Kafka Works?
Kafka’s architecture revolves around producers, brokers, consumers, and ZooKeeper. Here’s a breakdown of how each component contributes to Kafka’s functionality:
- Producers: Publish messages to Kafka topics.
- Brokers: Store and manage the messages that producers send to Kafka topics.
- Consumers: Subscribe to topics and process the messages stored by brokers.
- ZooKeeper: Manages and coordinates Kafka brokers, ensuring proper synchronization and maintaining metadata about topics and partitions.
Partitioning ensures that messages are distributed across brokers, enabling scalability, while replication ensures data durability and fault tolerance, providing high availability and recovery in case of broker failures.
Step 1: Create a Docker Network
docker network create kafka-networkStep 2: Setup Zookeeper
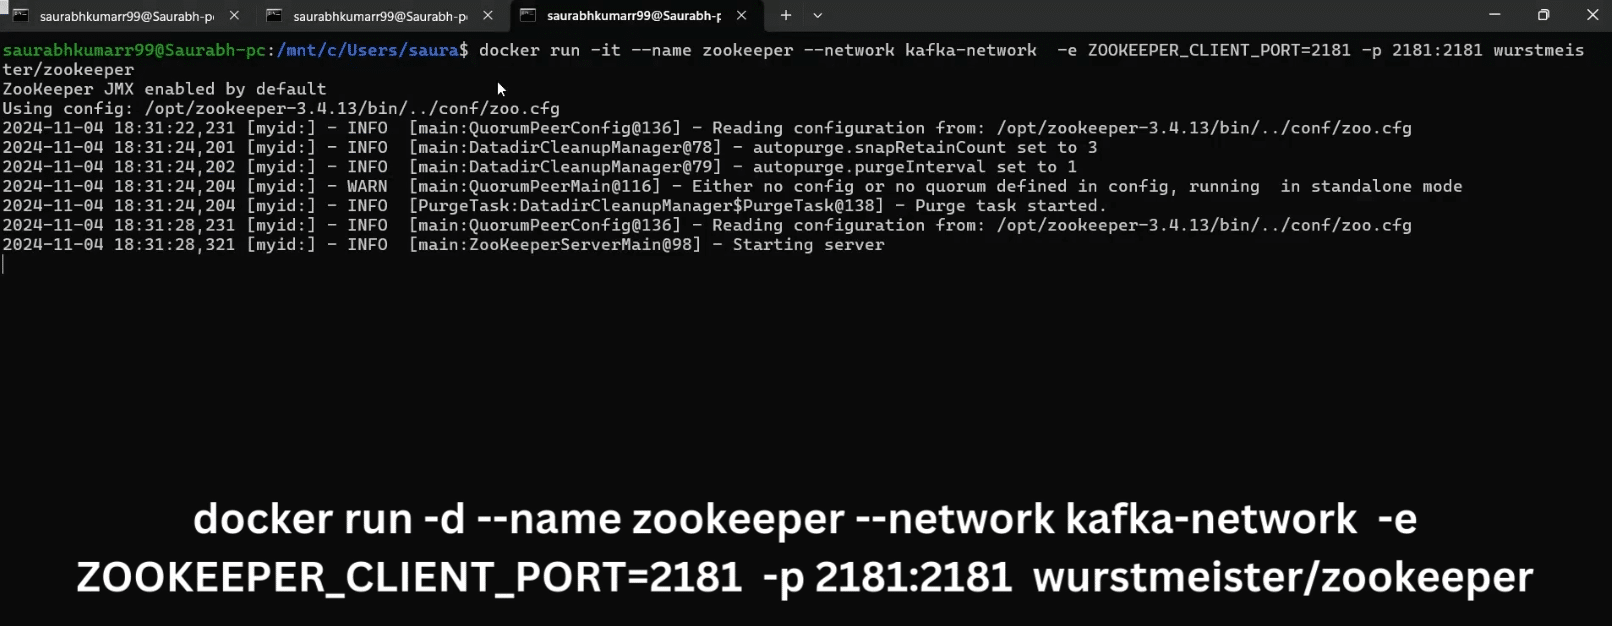
i-Pull Zookeeper Image:
docker pull wurstmeister/zookeeperdocker run --name zookeeper --network kafka-network -e ZOOKEEPER_CLIENT_PORT=2181 -p 2181:2181 wurstmeister/zookeeperStep 3: Setup Kafka
docker pull wurstmeister/kafkadocker run -d --name kafka --network kafka-network -e KAFKA_ZOOKEEPER_CONNECT=zookeeper:2181 -e KAFKA_LISTENERS=PLAINTEXT://0.0.0.0:9092 -e KAFKA_ADVERTISED_LISTENERS=PLAINTEXT://localhost:9092 -p 9092:9092 wurstmeister/kafka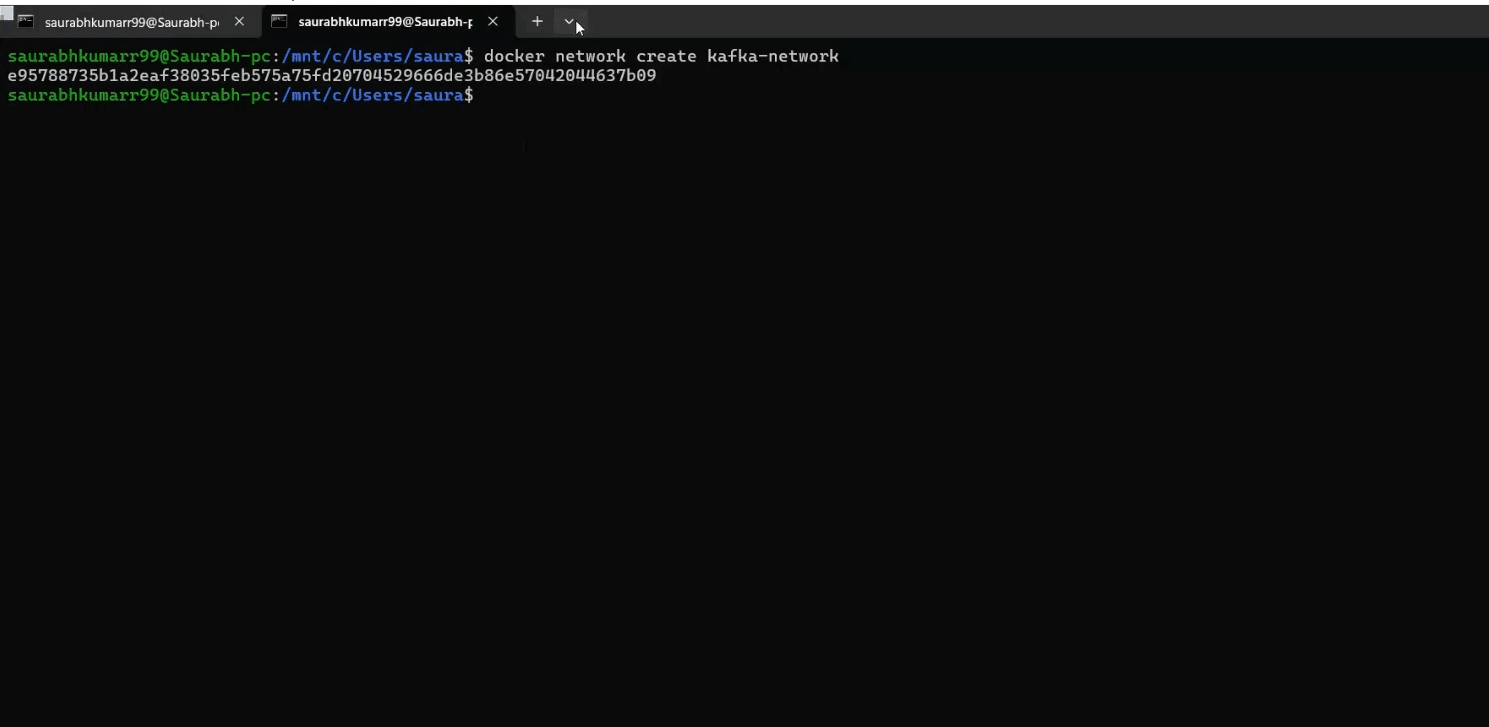

Step 4: Check Container Connections
docker ps command. This will show you the container IDs, names, and other details like status and ports:
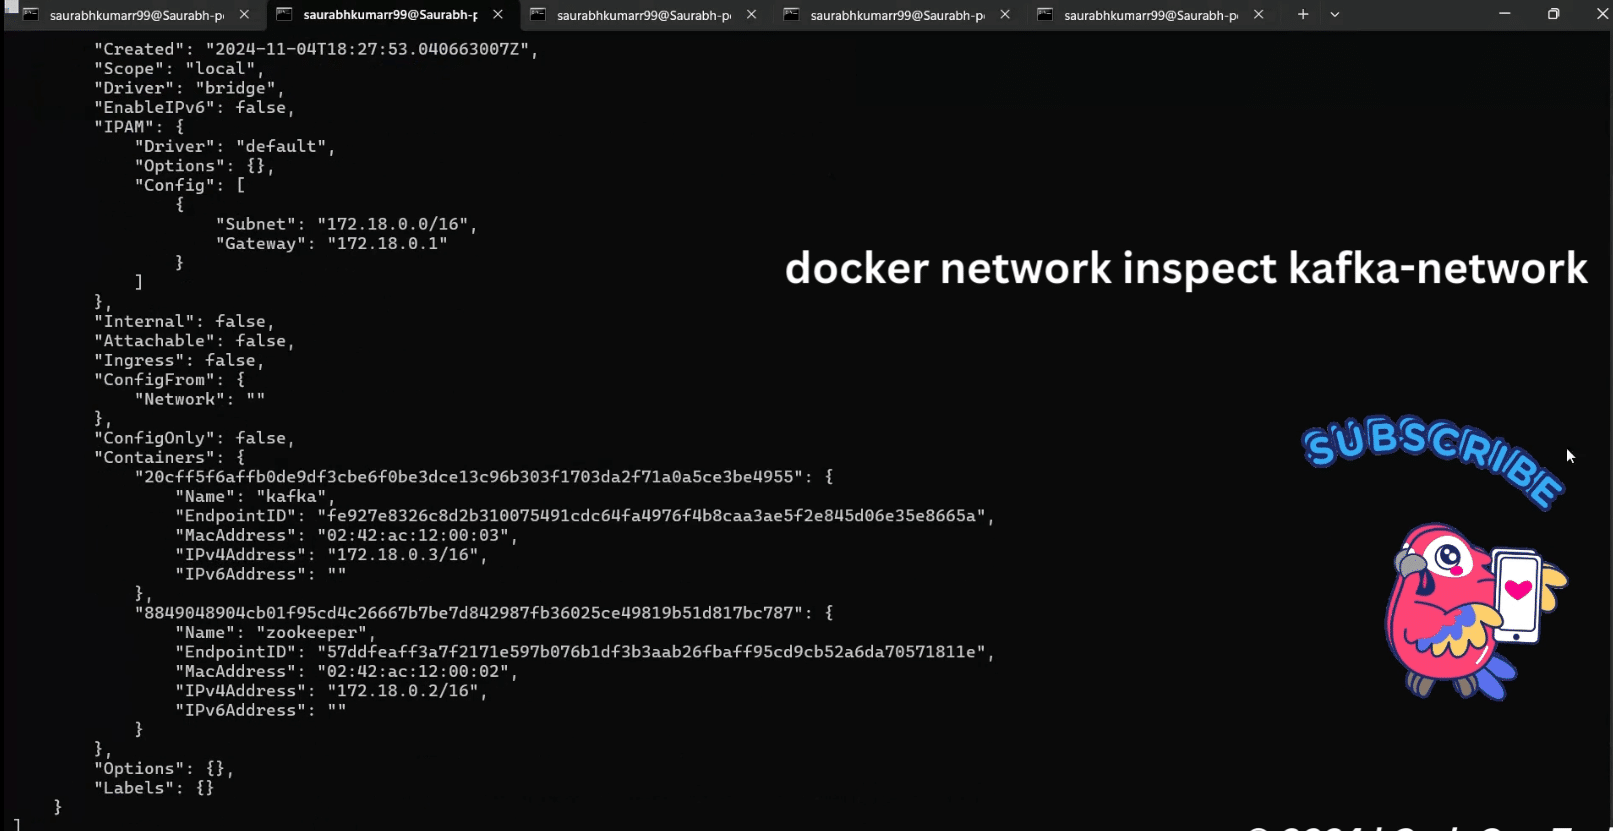
docker psdocker inspect kafka-network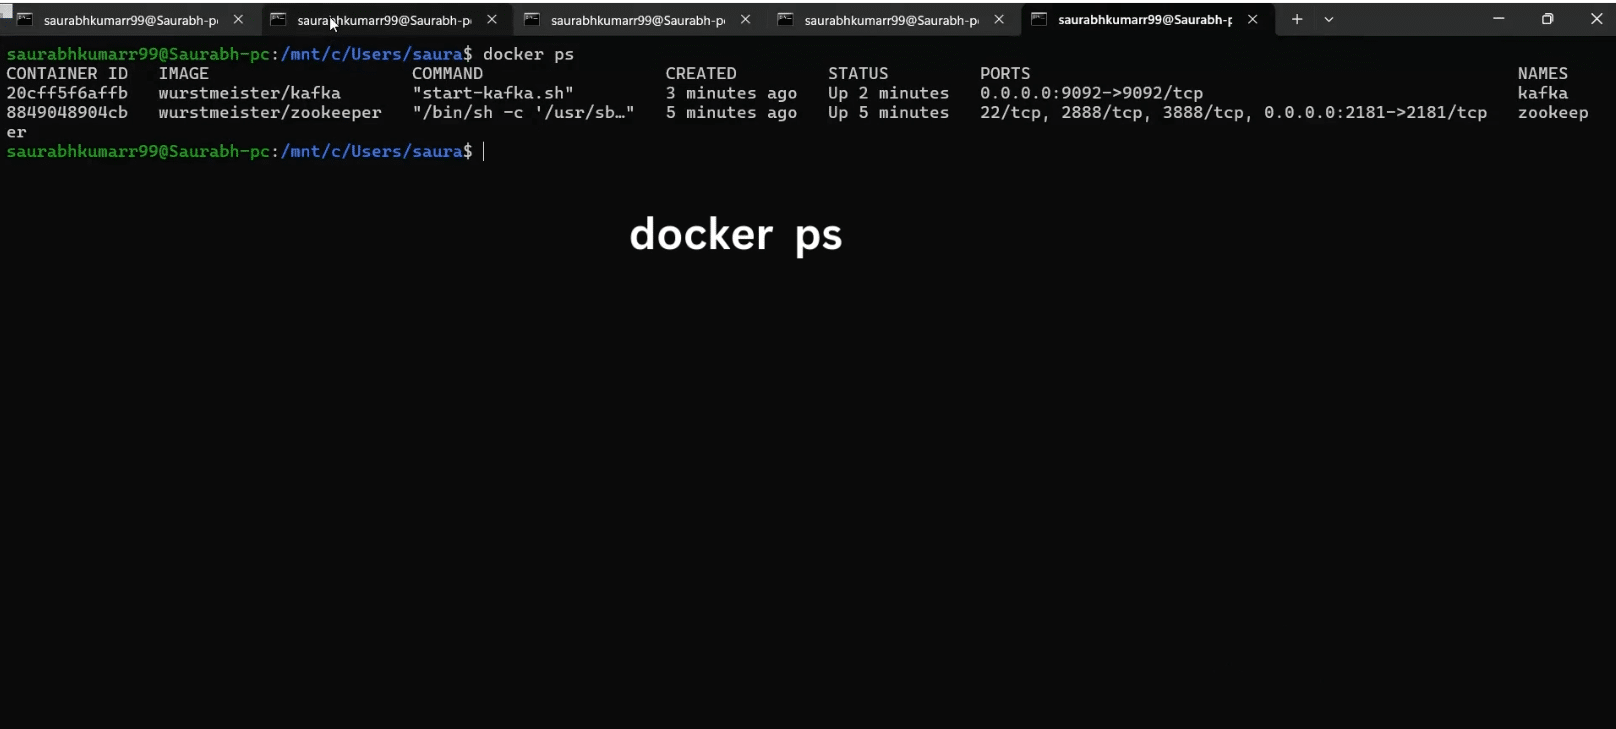
For a detailed article on setting up Docker and its role in simplifying software deployment, check out A Comprehensive Guide to Docker: Revolutionizing Software Deployment.
This process allows us to easily manage and scale Kafka and Zookeeper in a containerized environment, ensuring smooth communication between the components.
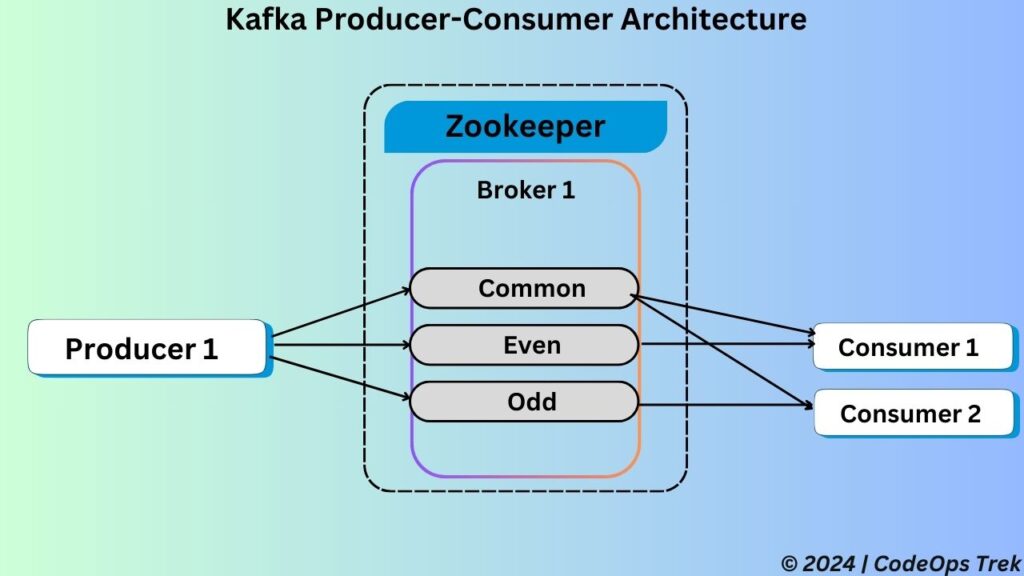
Before diving into the implementation, let’s clarify the architecture we’ll follow for our producer and consumers.
- Single Broker Setup: We will use a single Kafka broker for simplicity.
- Topics:
- Common Topic: Both consumers will subscribe to this topic.
- Even Topic: The first consumer will subscribe to this topic to process even-numbered messages.
- Odd Topic: The second consumer will subscribe to this topic to process odd-numbered messages.
- Producer: A single producer will be responsible for publishing data to all three topics.
- Consumers:
- Consumer A: Subscribes to the common-topic and even-topic.
- Consumer B: Subscribes to the common-topic and odd-topic.
This setup allows us to demonstrate how Kafka handles topics, partitioning, and multiple consumer groups.
To set up a Kafka producer in Spring Boot, follow these steps:
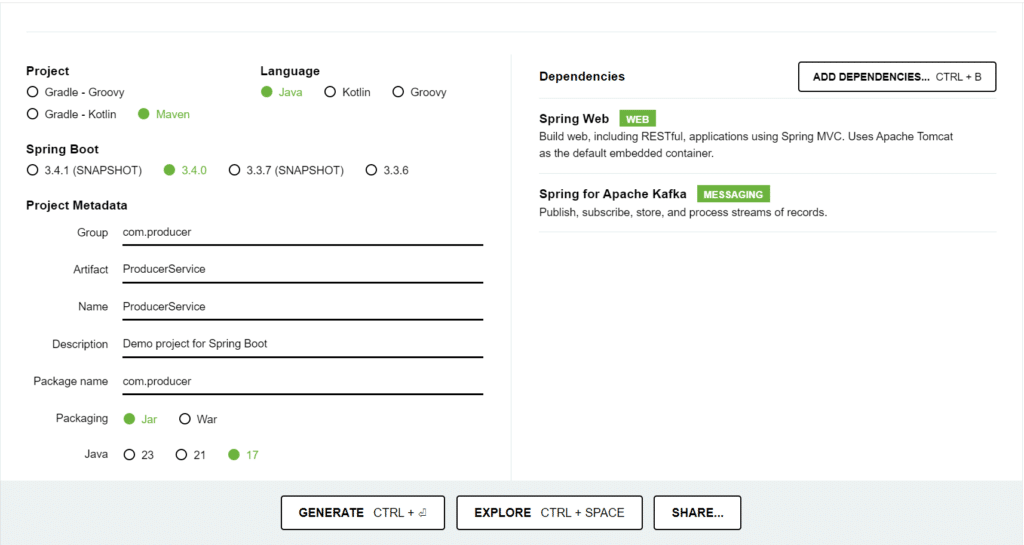
Step 1: Initialize the Spring Boot Project
- Open Spring Initializr:
Navigate to Spring Initializr. - Fill in Project Details:
- Group:
com.producer - Artifact:
producer-service - Name:
producer-service - Package:
com.producer
- Group:
- Select Dependencies:
Add the following dependencies:- Spring Web: For REST APIs to produce Kafka messages.
- Spring for Apache Kafka: To interact with Kafka.
- Generate the Project:
Click Generate to download the project as a.zipfile. Extract it into your workspace.
Step 2- Producer Architecture
src/main/java/com/producer
│
├── controller
│ └── ProducerController.java // Endpoint to trigger message production
│
├── service
│ └── ProducerService.java // Service to send messages to Kafka topics
│
└── config
└── KafkaProducerConfig.java // Kafka producer configuration
└── KafkaTopicConfig.java // Kafka topic creation configuration
Here’s a brief explanation of each class in your Kafka producer architecture:
ProducerController.java: Exposes REST endpoints to trigger message production to various Kafka topics.ProducerService.java: Contains the logic for sending messages to Kafka topics via the KafkaTemplate.KafkaProducerConfig.java: Configures Kafka producer settings, such as connection details and serialization settings.KafkaTopicConfig.java: Configures and manages Kafka topics (To create topics dynamically within the application).
You can check out the complete Kafka producer code from GitHub at the following link: KafkaProducerService on GitHub.
ProducerController.java
import com.producer.service.ProducerService;

@RestController
@RequestMapping("/api")
public class ProducerController {

	@Autowired
	ProducerService producerService;

    @GetMapping("/publish/common")
    public String sendMessageToCommonTopic(@RequestParam("message") String message) {
        producerService.sendMessageToCommonTopic(message);
        return "Message sent to common topic: "+message;
    }

    @GetMapping("/publish/number")
    public String sendMessageToOddOrEvenTopic(@RequestParam("message") String message) {
        try {
            int number = Integer.parseInt(message);
            if (number % 2 == 0) {
                producerService.sendMessageToEvenTopic(message);
                return "Message sent to even topic: "+message;
            } else {
                producerService.sendMessageToOddTopic(message);
                return "Message sent to odd topic: "+message;
            }
        } catch (NumberFormatException e) {
            return "Invalid input: please provide a valid integer";
        }
    }
}
package com.producer.service;

import org.springframework.beans.factory.annotation.Autowired;
import org.springframework.kafka.core.KafkaTemplate;
import org.springframework.stereotype.Service;

@Service
public class ProducerService {

	@Autowired
	private KafkaTemplate kafkaTemplate;

	public void sendMessageToCommonTopic(String message) {
		kafkaTemplate.send("common-topic", message);
	}

	public void sendMessageToEvenTopic(String message) {
		kafkaTemplate.send("even-topic", message);
	}

	public void sendMessageToOddTopic(String message) {
		kafkaTemplate.send("odd-topic", message);
	}
}
package com.producer.config;

import org.apache.kafka.clients.producer.ProducerConfig;
import org.apache.kafka.common.serialization.StringSerializer;
import org.springframework.context.annotation.Bean;
import org.springframework.context.annotation.Configuration;
import org.springframework.kafka.core.KafkaTemplate;
import org.springframework.kafka.core.ProducerFactory;
import org.springframework.kafka.core.DefaultKafkaProducerFactory;

import java.util.HashMap;
import java.util.Map;

@Configuration
public class KafkaProducerConfig {

    @Bean
    public ProducerFactory producerFactory() {
        Map configProps = new HashMap<>();
        configProps.put(ProducerConfig.BOOTSTRAP_SERVERS_CONFIG, "localhost:9092"); // Adjust as needed
        configProps.put(ProducerConfig.KEY_SERIALIZER_CLASS_CONFIG, StringSerializer.class);
        configProps.put(ProducerConfig.VALUE_SERIALIZER_CLASS_CONFIG, StringSerializer.class);
        return new DefaultKafkaProducerFactory<>(configProps);
    }

    @Bean
    public KafkaTemplate kafkaTemplate() {
        return new KafkaTemplate<>(producerFactory());
    }
}
package com.producer.config;

import org.apache.kafka.clients.admin.NewTopic;
import org.springframework.context.annotation.Bean;
import org.springframework.context.annotation.Configuration;
import org.springframework.kafka.config.TopicBuilder;

@Configuration
public class KafkaTopicConfig {

    @Bean
    public NewTopic commonTopic() {
        return TopicBuilder.name("common-topic")
                .partitions(1) // Set the desired number of partitions
                .replicas(1)   // Set the desired replication factor
                .build();
    }

    @Bean
    public NewTopic evenTopic() {
        return TopicBuilder.name("even-topic")
                .partitions(1)
                .replicas(1)
                .build();
    }

    @Bean
    public NewTopic oddTopic() {
        return TopicBuilder.name("odd-topic")
                .partitions(1)
                .replicas(1)
                .build();
    }
}
spring.application.name=ProducerService

# Set the server port
server.port=8085

# Set the Kafka server details
spring.kafka.bootstrap-servers=localhost:9092

# Enable auto creation of topics if needed (usually in a development environment)
spring.kafka.admin.auto-create-topics=true

# Producer configurations
spring.kafka.producer.key-serializer=org.apache.kafka.common.serialization.StringSerializer
spring.kafka.producer.value-serializer=org.apache.kafka.common.serialization.StringSerializerTo set up a Kafka producer in Spring Boot, follow these steps:
Step 1: Initialize the Spring Boot Project
- Open Spring Initializr:
Navigate to Spring Initializr. - Fill in Project Details:
- Group:
com.consumerA - Artifact:
consumer-service - Name:
consumer-service - Package:
com.consumer
- Group:
- Select Dependencies:
Add the following dependencies:- Spring Web: For REST APIs to produce Kafka messages.
- Spring for Apache Kafka: To interact with Kafka.
- Generate the Project:
Click Generate to download the project as a.zipfile. Extract it into your workspace.
Step 2- Consumer Architecture
src/main/java/com/consumer
│
├── config
│   └── KafkaConsumerConfig.java   // Kafka consumer configuration
│
└── service
    └── ConsumerService.java       // Service to consume messages from Kafka topics
Here’s a brief explanation of each class in your Kafka consumer architecture:
KafkaConsumerConfig.java:
Configures the Kafka consumer settings, such as the bootstrap server address, group ID, key and value deserializers, and other essential properties required for the consumer to connect and subscribe to Kafka topics.ConsumerService.java:
Contains the core logic for consuming messages from Kafka topics. It uses@KafkaListenerto subscribe to specific topics and defines how incoming messages should be processed or logged.
Consumer Service A
You can check out the complete Kafka Consumer A code from GitHub at the following link: KafkaConsumerServiceA on GitHub.
package com.consumer.config;

import org.apache.kafka.clients.consumer.ConsumerConfig;
import org.apache.kafka.common.serialization.StringDeserializer;
import org.springframework.context.annotation.Bean;
import org.springframework.context.annotation.Configuration;
import org.springframework.kafka.annotation.EnableKafka;
import org.springframework.kafka.config.ConcurrentKafkaListenerContainerFactory;
import org.springframework.kafka.core.ConsumerFactory;
import org.springframework.kafka.core.DefaultKafkaConsumerFactory;

import java.util.HashMap;
import java.util.Map;

@Configuration
@EnableKafka
public class KafkaConsumerConfig {

    @Bean
    public ConsumerFactory consumerFactory() {
        Map configProps = new HashMap<>();
        configProps.put(ConsumerConfig.BOOTSTRAP_SERVERS_CONFIG, "localhost:9092"); // Kafka server address
        configProps.put(ConsumerConfig.GROUP_ID_CONFIG, "my-consumer-group"); // Consumer group ID
        configProps.put(ConsumerConfig.KEY_DESERIALIZER_CLASS_CONFIG, StringDeserializer.class);
        configProps.put(ConsumerConfig.VALUE_DESERIALIZER_CLASS_CONFIG, StringDeserializer.class);
        configProps.put(ConsumerConfig.AUTO_OFFSET_RESET_CONFIG, "earliest"); // Start reading from the earliest offset if no offset is present
        return new DefaultKafkaConsumerFactory<>(configProps);
    }

    @Bean
    public ConcurrentKafkaListenerContainerFactory kafkaListenerContainerFactory() {
        ConcurrentKafkaListenerContainerFactory factory = new ConcurrentKafkaListenerContainerFactory<>();
        factory.setConsumerFactory(consumerFactory());
        return factory;
    }
} package com.consumer.service;
import org.springframework.kafka.annotation.KafkaListener;
import org.springframework.stereotype.Service;
@Service
public class ConsumerService {
// Listener for the common-topic
@KafkaListener(topics = "common-topic", groupId = "my-consumer-group")
public void consumeCommonTopicMessage(String message) {
System.out.println("Received message from common-topic: " + message);
}
// Listener for the even-topic
@KafkaListener(topics = "even-topic", groupId = "my-consumer-group")
public void consumeEvenTopicMessage(String message) {
System.out.println("Received message from even-topic: " + message);
}
}- application.properties
spring.application.name=ConsumerServiceA

# Set the server port
server.port=8086

# Set the Kafka server address
spring.kafka.bootstrap-servers=localhost:9092

# Consumer group ID for this application
spring.kafka.consumer.group-id=my-consumer-group

# Deserializers for the keys and values in messages
spring.kafka.consumer.key-deserializer=org.apache.kafka.common.serialization.StringDeserializer
spring.kafka.consumer.value-deserializer=org.apache.kafka.common.serialization.StringDeserializer

# Configure offset reset behavior
spring.kafka.consumer.auto-offset-reset=earliestConsumer Service B
You can check out the complete Kafka Consumer A code from GitHub at the following link: KafkaConsumerServiceB on GitHub.
Consumer Service B is replica of Consumer Service A, It just a part of another consumer group and consumer common topic data and odd topic data.
Starting the Application
Start the Producer Service:
Begin by running the Kafka Producer Service application. This service will first create the topics configure in topic configuration class. This service contains the controllers required to produce data to thecommon,odd, andeventopics.Start the Consumer Services:
- Launch Consumer Service A, which is configured to consume data from the
commonandeventopics. - Launch Consumer Service B, which is configured to consume data from the
commonandoddtopics.
- Launch Consumer Service A, which is configured to consume data from the
Produce Data via the Producer Controller:
Use the endpoints exposed in the Producer Service (viaProducerController) to send data to the respective Kafka topics:- Send messages to the
commontopic. - Send even numbers to the
eventopic. - Send odd numbers to the
oddtopic.
- Send messages to the
Consumers Process Data:
- Consumer Service A will process messages from the
commonandeventopics as per its configuration. - Consumer Service B will process messages from the
commonandoddtopics based on its configuration.
- Consumer Service A will process messages from the
This ensures that data is correctly routed to the appropriate consumers according to their topic subscriptions.
In this guide, we explored the fundamentals of Apache Kafka and implemented a producer-consumer architecture using Spring Boot. We began by understanding key Kafka concepts, setting up Kafka and Zookeeper using Docker, and then moved on to building and configuring a Kafka Producer and two Kafka Consumers. Through practical implementation, we demonstrated how messages can be seamlessly produced and consumed across different topics.
Kafka’s robust architecture ensures scalability, fault tolerance, and high throughput, making it an excellent choice for building real-time data pipelines and streaming applications. By leveraging Spring Boot, we simplified the integration process and enhanced the efficiency of our producer-consumer setup.
If you want to dive deeper into Kafka’s capabilities, configurations, and advanced features, refer to the official Introduction to Apache Kafka.
By now, you should have a solid understanding of how to work with Kafka in a Spring Boot environment. If you found this guide helpful, be sure to share it with others and continue exploring the powerful world of distributed systems!
