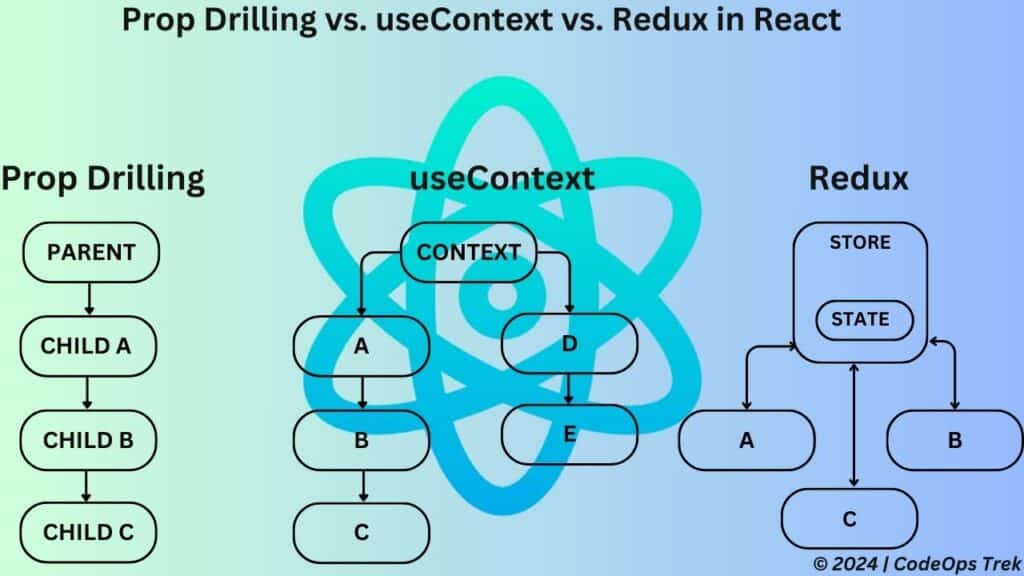
State management in React can be a challenging task, especially as your application scales. In this blog, we will compare Prop Drilling, Context API, and Redux—three popular methods for handling state in React. Understanding the strengths and weaknesses of each approach will help you make an informed decision when managing state in your React applications.
Table of Contents
Before we explore state management techniques, let’s begin by setting up a React project. This section will guide you through creating a React application, understanding the project structure, and organizing your components effectively.
Creating a React Project
- Install Node.js: Download and install Node.js from the official website.
- Create a React App: Use Create React App to quickly set up a new React project:
npx create-react-app my-react-app
cd my-react-app
npm start
To streamline your React projects, don’t miss our detailed guides on how to deploy your React application on GitHub, creating a Docker image for your React app, and our essential Docker tutorial. These resources will guide you through each step, ensuring your applications are efficiently deployed and managed.
What is Prop Drilling?
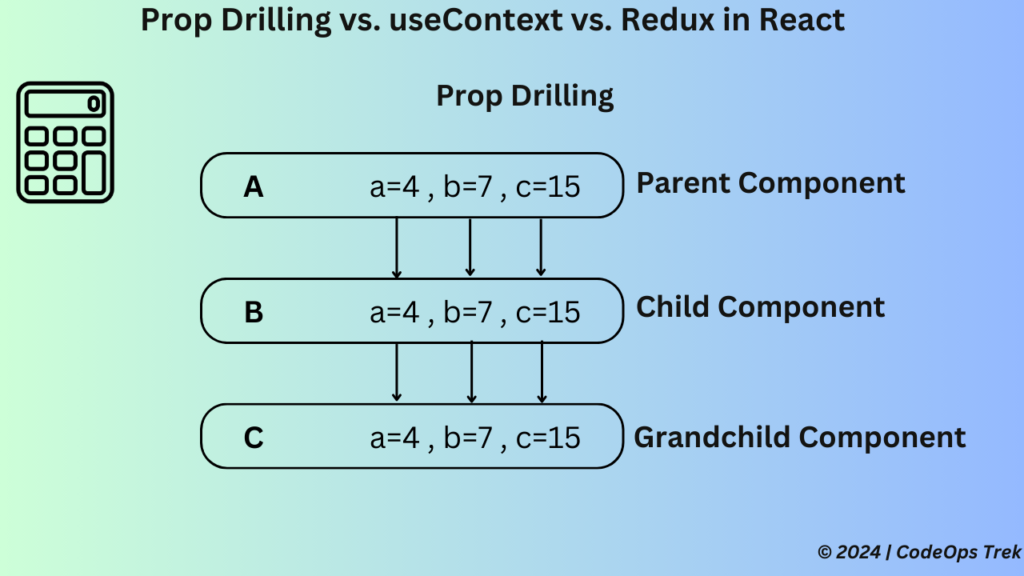
Prop Drilling refers to the process of passing data from a parent component to deeply nested child components by passing it through each intermediate component. While this method works well for small applications, it can become cumbersome as the application grows, leading to complex and tightly coupled components.
Calculator Example
Let’s consider a simple calculator example that performs basic operations using three state values: a, b, and c. We have three components:
- Component A (Parent): Performs addition and comparison.
- Component B (Child): Performs subtraction and comparison.
- Component C (Grandchild): Performs multiplication and comparison.

src/
├── components/
│   ├── ParentComponent.js
│   ├── ChildComponent.js
│   └── GrandChildComponent.js
└── App.js
Explanation of Components
- ParentComponent: Holds the state variables
a = 4,b = 7, andc = 15. It passes these values down toChildComponent. - ChildComponent: Receives
a,b, andcas props fromParentComponent. It then passes these values toGrandChildComponent. - GrandChildComponent: Receives
a,b, andcas props fromChildComponentand performs its operations.
// ParentComponent.js
import React from 'react';
import ChildComponent from './ChildComponent';
const ParentComponent = () => {
const a = 4;
const b = 7;
const c = 15;
return // ChildComponent.js
import React from 'react';
import GrandChildComponent from './GrandChildComponent';
const ChildComponent = ({ a, b, c }) => {
return // GrandChildComponent.js
import React from 'react';
const GrandChildComponent = ({ a, b, c }) => {
const multiply = a * b;
return Multiplication: {multiply}, Comparison: {multiply === c ? 'Equal' : 'Not Equal'};
};
export default GrandChildComponent;
Pros and Cons of Prop Drilling:
1. Simplicity: Easy to understand and implement.
2. Direct: Data is directly passed to components that need it.
Cons:
1. Verbose: Can lead to deeply nested components
2. Hard to Maintain: Managing props through multiple levels can be cumbersome.
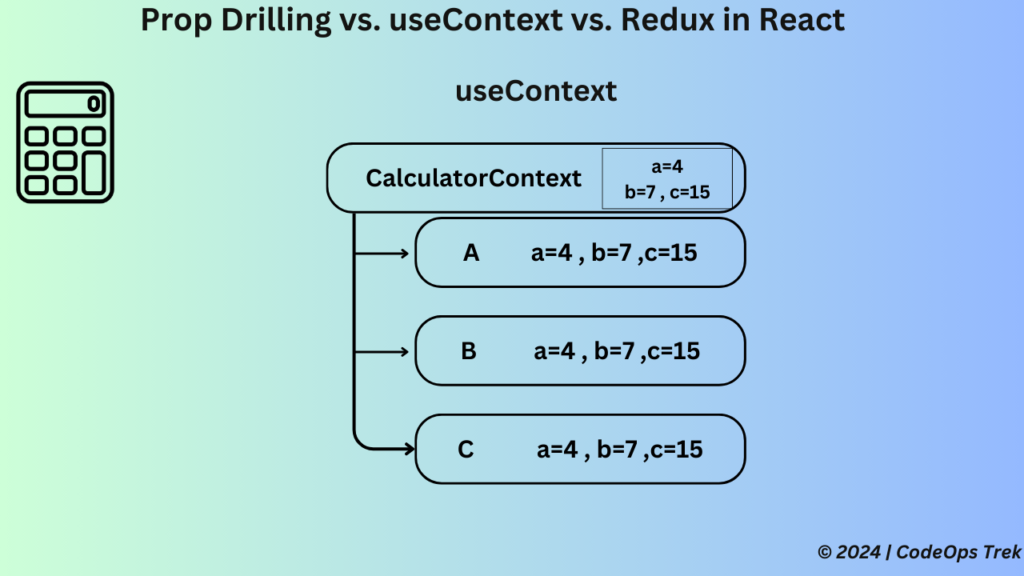
The Context API provides a way to pass data through the component tree without having to pass props down manually at every level. This approach is beneficial for managing state in applications where multiple components need to access the same data.
Calculator Example Using Context API
In this example, we’ll use a CalculatorContext to store the state values a, b, and c, and wrap our components in a CalculatorProvider to give them access to this context.
src/
├── components/
│   ├── ParentComponent.js
│   ├── ChildComponent.js
│   └── GrandChildComponent.js
├── context/
│   └── CalculatorContext.js
└── App.js
Explanation of Components
- CalculatorContext: Provides the context for storing state values.
- CalculatorProvider: Wraps the components and provides them access to the context values.
- ParentComponent, ChildComponent, GrandChildComponent: These components fetch the context values directly without the need for prop drilling.
// CalculatorContext.js
import React, { createContext, useContext } from 'react';

const CalculatorContext = createContext();

export const CalculatorProvider = ({ children }) => {
  const a = 4;
  const b = 7;
  const c = 15;

  return (

      {children}

  );
};

export const useCalculator = () => useContext(CalculatorContext);
// ParentComponent.js
import React from 'react';
import ChildComponent from './ChildComponent';
import { CalculatorProvider } from '../context/CalculatorContext';

const ParentComponent = () => {
  return (


  );
};

export default ParentComponent;
// ChildComponent.js
import React from 'react';
import GrandChildComponent from './GrandChildComponent';
const ChildComponent = () => {
return // GrandChildComponent.jsimport React from 'react';
import { useCalculator } from '../context/CalculatorContext';
const GrandChildComponent = () => {
const { a, b, c } = useCalculator();
const multiply = a * b;
return Multiplication: {multiply}, Comparison: {multiply === c ? 'Equal' : 'Not Equal'};
};
export default GrandChildComponent;
Pros and Cons of Context API
1. Eliminates the need for prop drilling. 2. Simplifies state management in larger applications.
3. Components can independently access the context.
Cons:
1. Scope is limited to the component tree wrapped by the provider.
2. Can lead to re-renders of all components within the provider.
The useContext hook is a powerful feature in React that allows you to consume context directly within a functional component. It provides an easier and more readable alternative to the traditional Context.Consumer component pattern. useContext simplifies accessing context values and reduces boilerplate code.
Calculator Example Using useContext
We will see the same simple calculator example which performs multiplication and compares the result to a predefined value. Instead of prop drilling or setting up a full Redux store, you can use the useContext hook to share the necessary state across components.

my-calculator-app/
├── src/
│   ├── components/
│   │   ├── GrandChildComponent.js
│   │   ├── ChildComponent.js
│   │   └── ParentComponent.js
│   ├── context/
│   │   └── CalculatorContext.js
│   ├── App.js
│   └── index.js
└── package.json
Explanation of Components
- CalculatorContext.js: This file defines the context and provides the context values to be consumed by components.
- ParentComponent.js: Wraps the
ChildComponentin a context provider and manages the state. - ChildComponent.js: Passes the context to
GrandChildComponent. - GrandChildComponent.js: Consumes the context values using the
useContexthook and performs the necessary calculations.
// CalculatorContext.js
import React, { createContext, useState } from 'react';

export const CalculatorContext = createContext();

export const CalculatorProvider = ({ children }) => {
  const [a, setA] = useState(4);
  const [b, setB] = useState(7);
  const [c, setC] = useState(15);

  return (

      {children}

  );
};
// ParentComponent.js
import React from 'react';
import { CalculatorProvider } from '../context/CalculatorContext';
import ChildComponent from './ChildComponent';

const ParentComponent = () => {
  return (


  );
};

export default ParentComponent;
// ChildComponent.js
import React from 'react';
import GrandChildComponent from './GrandChildComponent';
const ChildComponent = () => {
return // GrandChildComponent.js
import React, { useContext } from 'react';
import { CalculatorContext } from '../context/CalculatorContext';
const GrandChildComponent = () => {
const { a, b, c } = useContext(CalculatorContext);
const multiply = a * b;
return (
Multiplication: {multiply}, Comparison: {multiply === c ? 'Equal' : 'Not Equal'}
);
};
export default GrandChildComponent;
Pros and Cons of useContext
1. Simplified Context Consumption:
useContext makes it easy to consume context values directly in functional components.2. Cleaner Code: Reduces boilerplate and improves code readability compared to the traditional
Context.Consumer approach.3. Built-In Solution: No need for additional libraries; it’s built into React.
Cons:
1. Re-renders: Changes in the context value can cause all consuming components to re-render, potentially affecting performance.
2. Limited to Small/Medium Apps: While useful,
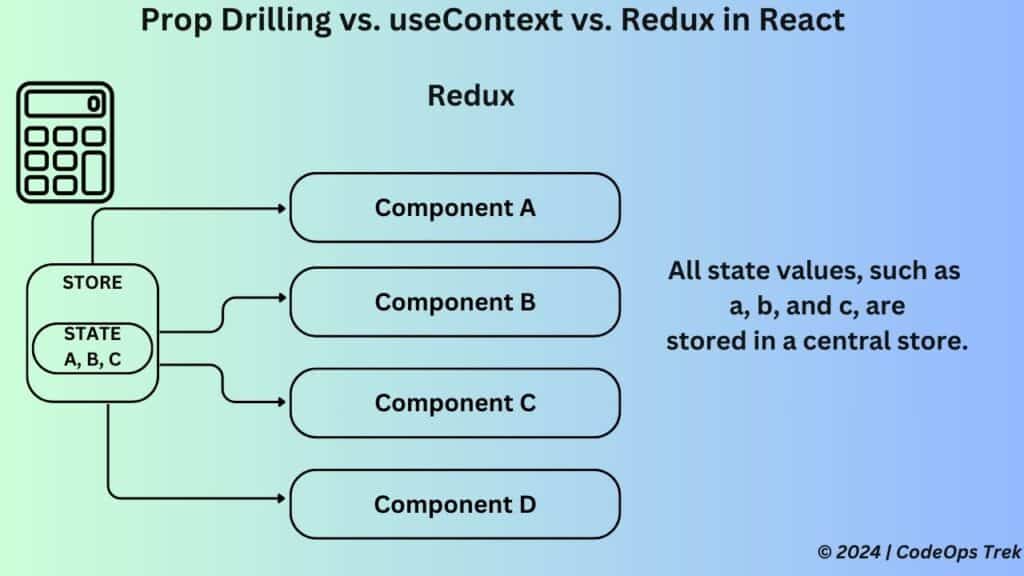
useContext may not be as scalable as Redux for large, complex applications with intricate state management needs. Redux is a powerful state management library that provides a global store for managing the state across your entire application. It is particularly useful in large-scale applications where managing state can become complex.
Calculator Example Using Redux
In this example, we’ll use Redux to manage the state values a, b, and c, and allow our components to access these values and dispatch actions to update them.

src/
├── components/
│   ├── ParentComponent.js
│   ├── ChildComponent.js
│   └── GrandChildComponent.js
├── redux/
│   ├── actions.js
│   ├── reducer.js
│   └── store.js
└── App.js
Explanation of Components
- Redux Store: Centralized state store that holds the values
a,b, andc. - Actions: Functions that dispatch updates to the Redux store.
- ParentComponent, ChildComponent, GrandChildComponent: These components connect to the Redux store to access and update state values.
// actions.js
export const setA = (value) => ({ type: 'SET_A', payload: value });
export const setB = (value) => ({ type: 'SET_B', payload: value });
export const setC = (value) => ({ type: 'SET_C', payload: value });
// reducer.js
const initialState = { a: 4, b: 7, c: 15 };

export const calculatorReducer = (state = initialState, action) => {
  switch (action.type) {
    case 'SET_A':
      return { ...state, a: action.payload };
    case 'SET_B':
      return { ...state, b: action.payload };
    case 'SET_C':
      return { ...state, c: action.payload };
    default:
      return state;
  }
};
// store.js
import { createStore } from 'redux';
import { calculatorReducer } from './reducer';

export const store = createStore(calculatorReducer);
// ParentComponent.js
import React from 'react';
import { Provider } from 'react-redux';
import ChildComponent from './ChildComponent';
import { store } from '../redux/store';

const ParentComponent = () => {
  return (


  );
};

export default ParentComponent;
// ChildComponent.js
import React from 'react';
import GrandChildComponent from './GrandChildComponent';
const ChildComponent = () => {
return
// GrandChildComponent.js
import React from 'react';
import { useSelector } from 'react-redux';

const GrandChildComponent = () => {
  const { a, b, c } = useSelector((state) => state);
  const multiply = a * b;
  return Multiplication: {multiply}, Comparison: {multiply === c ? 'Equal' : 'Not Equal'};
};

export default GrandChildComponent;
Pros and Cons of Redux
1. Centralized state management.
2. Predictable state updates through actions and reducers.
3. Scalable for large applications.
Cons:
1. Steeper learning curve.
2. Requires more boilerplate code.
3. Can lead to over-engineering for small applications.
In this guide, we explored three popular state management techniques in React: Prop Drilling, Context Api, and Redux. Each method comes with its own strengths and weaknesses, making it essential to choose the right approach based on your application’s needs.
Prop Drilling is straightforward but can become cumbersome in large applications due to the need to pass props through multiple levels of components. Context API offers a more streamlined approach by eliminating prop drilling, but it’s best suited for managing global states with limited scope. Redux provides a robust and scalable solution ideal for large-scale applications, though it introduces additional complexity and has a steeper learning curve.
For more information on these state management techniques, you can refer to the official React documentation on Prop Drilling, useContext, and Redux.
