How to Setup ELK Stack in Docker: Step-by-Step Guide
ELK Stack Series

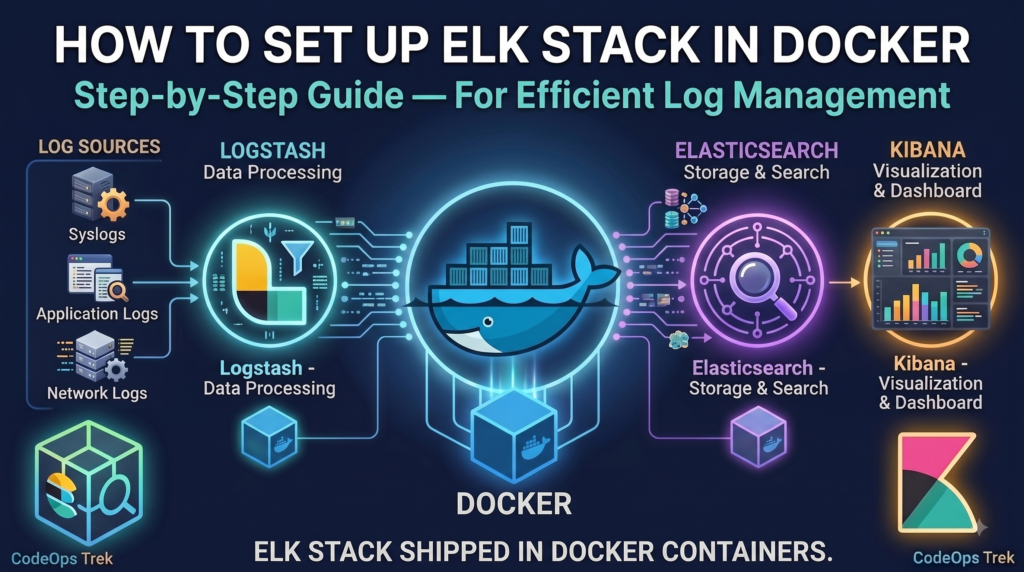
Setup ELK Stack in Docker to simplify log management without the hassle of manual installations. In this guide, we’ll walk through containerizing Elasticsearch, Logstash, and Kibana using Docker Compose — so you can spin up a fully working ELK Stack in minutes and start collecting, processing, and visualizing logs right away.
Introduction: Observability with ELK Stack
Observability is the backbone of any reliable, production-grade application. Without proper logging, debugging issues in distributed systems or microservices becomes nearly impossible. This is where the ELK Stack — Elasticsearch, Logstash, and Kibana — comes in.
We’ve already covered the fundamentals in detail in our earlier post: What is the ELK Stack?. If you’re new to ELK, you can go through it later. For everyone else, here’s a quick recap.
Our application, or our microservices, generate logs. These logs can be written into log files. Then, Logstash collects or reads these logs, processes and transforms them if required, and sends them to Elasticsearch. Elasticsearch stores and indexes these logs, making them easy to search and analyze. And finally, we use Kibana to visualize and monitor these logs through dashboards and a user-friendly interface.
So, in simple terms, our flow looks like this:
In this post, we’ll integrate our Loyalty Application with the ELK Stack using Docker — giving you a real, working example instead of just theory.
Loyalty Application
What is a Loyalty Application?
A loyalty application is used to manage customer loyalty. It’s a common building block in e-commerce and retail systems, and a great real-world candidate for demonstrating observability, since it involves multiple transactional flows worth logging and monitoring.
The basic flow of our application is:
- First, we register a customer.
- Once the customer is registered, we can provide some loyalty points to the customer’s wallet.
- The customer can then use or redeem those loyalty points while making a purchase.
- And if required, the redeemed points can also be refunded.
This gives us a simple but realistic transaction flow that we can use to demonstrate application logging.
Full source code for the Loyalty Application used in this guide is available on GitHub.
Loyalty Application API
Customer APIs
The first category is Customer APIs. We have APIs for creating a customer and performing the basic CRUD operations on the customer.
- Create Customer
- Get Customer
- Get All Customers
- Update Customer
- Delete Customer
- Activate Customer
- Deactivate Customer
Transaction APIs
- Earn Point
- Redeem Point
- Refund Point
- Get Transactions
Loyalty Management API Postman collection.
API Sequence Flow
Learn how to build a REST API with Spring Boot, MySQL, and Docker in our complete step-by-step guide.
1. Create Customer
Registers a new customer in the system. The request first passes through validation — if the email already exists, the flow short-circuits with a 409 Conflict; otherwise, the customer is persisted and a 201 Created response is returned.
2. Earn Points
Credits loyalty points to a customer’s wallet. The system first verifies the customer exists and is active — if not found, it returns a 404; otherwise, the points are credited and the wallet balance is updated.
3. Redeem Points
Deducts loyalty points from a customer’s wallet during a purchase. The system verifies the customer exists and has sufficient balance — if the customer isn’t found, it returns a 404; if the balance is too low, a 400; otherwise, points are debited and the transaction completes.
4. Refund Points
Reverses a previous redemption and credits the points back to the customer’s wallet. The system verifies the customer, confirms the original redemption transaction exists, and checks it hasn’t already been refunded — before crediting the points back.
Application Code Structure
Here’s the layered package structure for our Loyalty Application, built on standard Spring Boot conventions — each package has a single responsibility, which also makes it easy to trace exactly which layer a log line came from once ELK is wired in.
Why this structure works well:
- Controller → Service → Repository is a classic 3-tier separation: controllers only handle HTTP concerns, services hold business rules, repositories talk to the database.
- Service as an interface +
service.implkeeps the contract decoupled from the implementation — useful if you ever need to swap logic or mock the service layer in tests. - DTOs are split by direction (
dto.requestvsdto.response) so request validation and response shaping don’t leak into each other. - A single
GlobalExceptionHandlercentralizes error handling instead of scattering try-catch blocks across controllers — this is also what feeds theERROR-level logs you saw flowing into Logstash in the sequence diagrams above.
Log Management: Preparing Application Logs for ELK Stack
Before Logstash can do anything useful, the application itself needs to produce logs that are consistent, structured, and traceable. This isn’t a Logstash concern — it’s entirely on the application side, and it’s the difference between logs you can read and logs you can query. We’ll do this in three stages: generating logs into a shared location, formatting them as JSON, and enriching them with tracing metadata.
Log Generation
In a real deployment, logs shouldn’t live inside the application’s own folder — if the app gets redeployed or the container is rebuilt, you don’t want your log history tied to that lifecycle. So the first step is creating a folder outside the application as elk-resource, parallel to it, that will act as the shared log source for Logstash.

Inside elk-resource, a logs folder will hold every log file.
Now add this to application.properties:
Why this matters in production: a real system rarely runs a single instance of a single service. You’ll likely have multiple microservices, and each microservice may run multiple instances behind a load balancer. If every instance wrote to the same log file, you’d get interleaved, unattributable log lines. Naming each file as ${spring.application.name}-${HOSTNAME} means every instance of every service writes to its own file, but all of those files land in the same shared logs folder — which is exactly what Logstash will watch.
On rotation: Logback creates a new file per day, per service, per instance. If that day’s file crosses the 10MB cap before the day ends, it rotates into an additional numbered file for that same day rather than waiting for midnight — so you might see loyalty-program-localhost.2026-08-21.0.log, .1.log, and so on if traffic is heavy. Files older than 30 days are cleaned up automatically, and the total archive is capped at 1GB regardless of age.
Restart the application, and you’ll find the logs folder auto-created inside elk-resource. If you’re running 5 instances of the service, you’ll see 5 separate .log files — one per instance, each named by service + hostname.

Log Optimization (Structured JSON Logging)
Looking at the log file above, each entry is a single line — but it’s plain text. Logstash can still read this and push it to Elasticsearch, and you’ll be able to view it in Kibana. The problem is what you can’t do with it: you can’t filter on customerId, you can’t build an alert on level: ERROR, and you can’t chart transactionType over time, because none of those are separate, queryable fields — they’re just substrings inside one long message.
The fix is to make the application emit structured JSON logs instead of plain text, so each field (timestamp, level, logger, message, and anything else we attach) becomes independently searchable in Elasticsearch.
If you’re on Spring Boot 3.4.0 or later: structured logging is built in — no extra dependency needed. Just add this to application.properties:
If you’re on Spring Boot below 3.4.0: there’s no built-in structured formatter, so you’ll configure Logback directly using the logstash-logback-encoder library.
Add the dependency:
Then create logback-spring.xml in src/main/resources, mirroring the same file-naming and rotation rules you set in application.properties earlier:
This keeps the exact same rotation behavior (10MB per file, 1GB total cap, 30-day retention) — just with LogstashEncoder producing JSON instead of Logback’s default plain-text pattern.
Restart the application either way, and the log file now looks like this:


Once Logstash picks these up and pushes them to Elasticsearch, you can filter, search, and build dashboards in Kibana on real fields — not just full-text search across a string.
Log Enhancement (Request Tracing with MDC)
JSON solves structure, but not traceability. In production, an application runs on a multithreaded server handling many concurrent API calls — so logs from ten different requests can interleave in the same file. Without something tying each log line back to the request that produced it, tracing a single transaction through the noise is nearly impossible.
The standard fix is a request ID: generate one ID per incoming request, attach it to every log line that request produces (via SLF4J’s MDC — Mapped Diagnostic Context, which is thread-local), and return it to the caller in the response. If a user reports an issue, they hand you the request ID, and you filter Kibana on it — done.
While we’re at it, it’s worth attaching a few more fields for the same reason multi-instance file naming mattered earlier in Log Generation: once Logstash merges every service’s and every instance’s logs into one Elasticsearch index, you lose the “which file did this come from” context you had on disk. So we also tag each log line with serviceName and instanceId, and — specific to this app — transactionType (EARNED / REDEEM / REFUND), since that’s a natural way to slice transaction logs in Kibana.
Create a filter package and add LoggingContextFilter:
The finally block matters — since threads are pooled and reused across requests, forgetting to clear MDC would leak one request’s requestId into the next request served by the same thread.
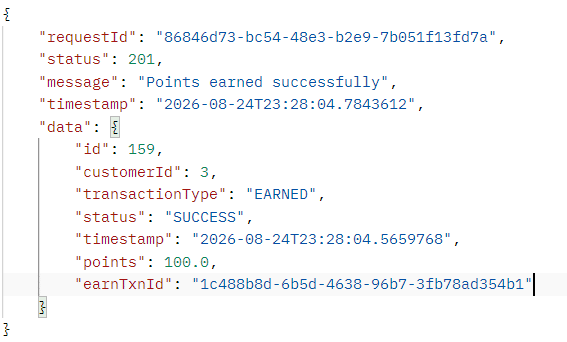
Then surface the request ID back to the caller by adding it to ApiResponse:
Now if a user hits an issue, the response itself hands them the requestId they need to give you — no digging required on their end.
Restart the application, and the logs are now fully enriched:

Log Enrichment (Key-Value Structured Logging)
At this point every log line already carries requestId, transactionType, serviceName, and instanceId as independent, filterable fields. That’s a big win — but look closely at the message field itself:
earnTxnId, customerId, and pointsEarned are sitting inside one long string. Elasticsearch can full-text search it, but you can’t filter on customerId: 3 or aggregate pointsEarned over time — they’re just substrings, not fields.
From String Interpolation to Key-Value Logging
The fix is to stop building the message with {} placeholders and switch to SLF4J’s fluent, key-value logging API instead. Each addKeyValue() call becomes its own independent JSON field once logstash-logback-encoder writes the log — so message stays a short, human-readable summary, and everything else becomes queryable on its own. We’ll apply the same fluent API to the transaction fields (earnTxnId, customerId, pointsEarned) as well as the request and response bodies, so both are searchable in Kibana instead of being buried inside one long log line.
“message”: “EARN transaction completed successfully | earnTxnId: 1c488b8d-6b5d-4638-96b7-3fb78ad354b1,
customerId: 3, pointsEarned: 100.0″
// New way — every field independently queryable
log.atInfo().setMessage(“EARN transaction completed successfully”)
.addKeyValue(“earnTxnId”, saved.getEarnTxnId())
.addKeyValue(“customerId”, customer.getCustomerId())
.addKeyValue(“pointsEarned”, saved.getPoints())
.addKeyValue(“payload”, toJsonString(saved))
.log();
Print Key-Values on Console Too
Add this to application.properties so the same key-value pairs show up while you’re watching console output locally, not just in the JSON file:
logging.pattern.console=%d{yyyy-MM-dd HH:mm:ss.SSS} %5p ${PID:-} — [%15.15t] [requestId: %X{requestId}] [txnType: %X{transactionType}] %-40.40logger{36} : %m %kvp%n
Now restart the application, hit the EARN API again, and you’ll see the logs printed with every field broken out separately.
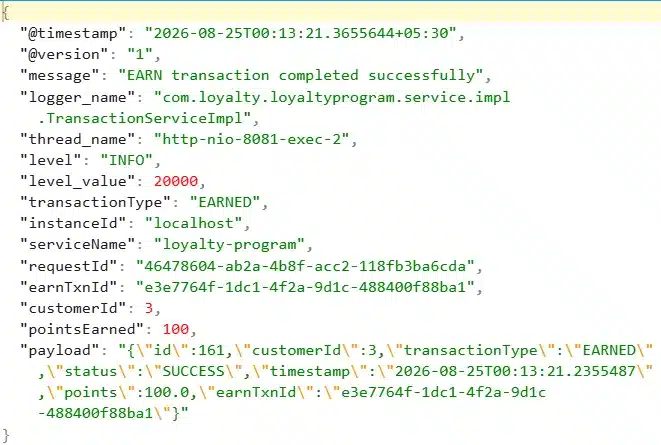
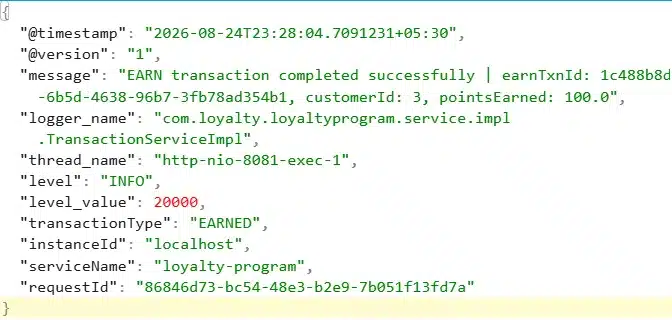
That’s the shift — from “logs you can read” to “logs you can query.” message is now earnTxnId, customerId, pointsEarned, and payload are all first-class fields Elasticsearch can filter and aggregate on.
Now our log generation is standard and production-based, and we can move toward the ELK setup.
Setup ELK Stack in Docker
With structured, enriched logs already writing into elk-resource/logs, the ELK side is just three containers: Elasticsearch to store and index, Logstash to read the log files and ship them, Kibana to search and visualize.

docker – -version
# List all downloaded images docker images
# List running containers docker ps
# List all containers, including stopped ones docker ps -a
# Run a container with a custom name docker run – -name <container_name> <image>
# List all Docker networks docker network ls
# Inspect a network — see which containers are attached docker network inspect elk-network
# Stream live logs from a container docker logs -f <container_name>
# Open a shell inside a running container docker exec -it <container_name> bash
# Stop a running container docker stop <container_name>
# Remove a stopped container docker rm <container_name>
Setting Up the Docker Network
Inside a container, localhost means that container itself — not the host machine, and not any other container. Elasticsearch, Logstash, and Kibana would each run in their own isolated container with their own localhost, so if Logstash tries to reach Elasticsearch at localhost:9200, it’s really just knocking on its own door.
The fix is a Docker network. Once containers are attached to the same custom network, they can reach each other directly by container name instead of localhost — Docker’s internal DNS resolves the name to the right container.
Setup Elasticsearch
Elasticsearch has to come up first — Logstash and Kibana both depend on it being reachable. First, let’s create a folder called elasticsearch-data inside elk-resource.
--name— container name:elasticsearch--network— network it joins:elk-network-p— ports exposed to the host:9200(REST API),9300(node communication)-v— named volume so index data survives container restarts- last line — the image:
elasticsearch:8.13.4
Give it 20–30 seconds to fully initialize before starting Logstash. Once it’s up, you can list every index at: http://localhost:9200/_cat/indices?v
Setup Logstash
Before running the Logstash container, it needs a pipeline definition — a config file telling it where to pull logs from, where to push them, and how to filter them along the way.
logstash.conf
Create a logstash-pipeline folder inside elk-resource, and add logstash.conf inside it.
Input — reads every .log file in the shared logs folder, treats each line as one JSON object, and keeps track of its read position via sincedb so restarts don’t re-ingest old logs:
Filter — tags each event with when Logstash processed it, and flags whether the JSON parsed cleanly:
Output — ships the event to a daily Elasticsearch index, and also prints it to the container’s console for debugging:
sincedb
If you ever run multiple Logstash containers, or restart one, it needs a way to remember which log lines it has already consumed — otherwise every restart would re-push the entire file. That’s what sincedb is for: Logstash writes its own offset-tracking file there. Just create an empty sincedb folder inside elk-resource; Logstash creates the file itself.
Your elk-resource folder now looks like this:
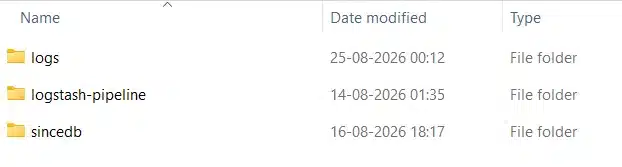
Now run the Logstash container, mounting all three folders:
--name— container name:logstash--network— network it joins:elk-network-v— three mounts: the pipeline config file, the logs folder, and the sincedb folder- last line — the image:
logstash:8.13.4
Make sure you swap in the correct absolute path to your own
elk-resourcefolder in each-vmount.
As soon as Logstash starts, it begins pulling logs and pushing them into the Elasticsearch index — creating the index itself if it doesn’t exist yet. To watch it happening:
You’ll see it actively pulling the logs. Head back to http://localhost:9200/_cat/indices?v and you’ll now see a fresh loyalty-program-* index. To pull the actual data back out: http://localhost:9200/loyalty-program-*/_search?pretty
With that, log collection and shipping into Elasticsearch is fully wired up.
Setup Kibana
With Elasticsearch holding the index and Logstash actively pushing data into it, we can now set up the last piece of this pipeline — Kibana.
--name— container name:kibana--network— network it joins:elk-network-p— port exposed to the host:5601(Kibana UI)-e— tells Kibana where to find Elasticsearch, using the container name (elasticsearch) instead oflocalhost, since we’re inside the same Docker network- last line — the image:
kibana:8.13.4
Give it a few seconds to boot up, then head to http://localhost:5601.
First Look at Kibana
The first time you open it, you’ll land on Kibana’s welcome/home page.

Before you can see any logs here, Kibana needs to know which Elasticsearch index to read from — that’s what a data view is for.
Create a Data View
Go to ☰ menu → Stack Management → Kibana → Data Views, then:
- Click Create data view
- Name: anything you like (e.g.
loyalty-logs) - Index pattern:
loyalty-program-* - Timestamp field: pick
@timestamp(Logstash adds this automatically) — or your own timestamp field if you’re using one - Click Save data view to Kibana
View Logs in Discover
Once the data view is saved, go to ☰ menu → Analytics → Discover. This opens a live view of every log document flowing into that index.
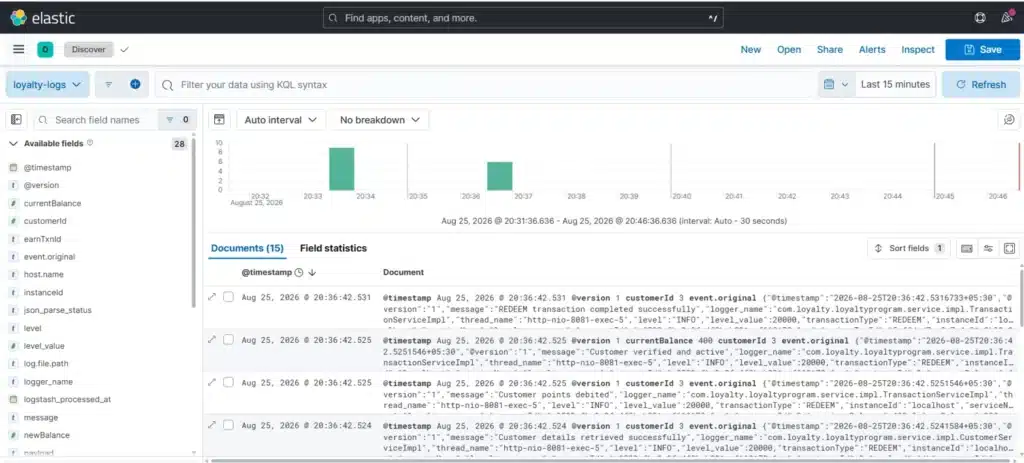
Expanding any log line opens a detail popup with the full document — every field, fully broken out, exactly as Logstash and your app enriched it.
That said, the default view (raw event.original JSON per row) isn’t the easiest to scan. You can make it far more useful by picking the fields you actually care about from the Available fields panel on the left, and adding them as columns.

In the view above, we’ve built a custom column layout with:
@timestamp, serviceName, instanceId, requestId, transactionType, customerId, message, payload
Now every log line reads like a proper structured record instead of a wall of JSON.
One thing you’ll notice: since multiple log lines for a single transaction are written within milliseconds of each other, they can appear slightly out of sequence when sorted purely by timestamp. This is expected behavior — it doesn’t affect analysis, since requestId still ties every related line together regardless of ordering.
Trace a Single Request
This is where the requestId field we added via MDC earlier really pays off. Search for a specific request ID in the KQL search bar, and Kibana filters down to just the log lines belonging to that one transaction — from “Initiating REDEEM transaction process” all the way to “REDEEM transaction completed successfully.”
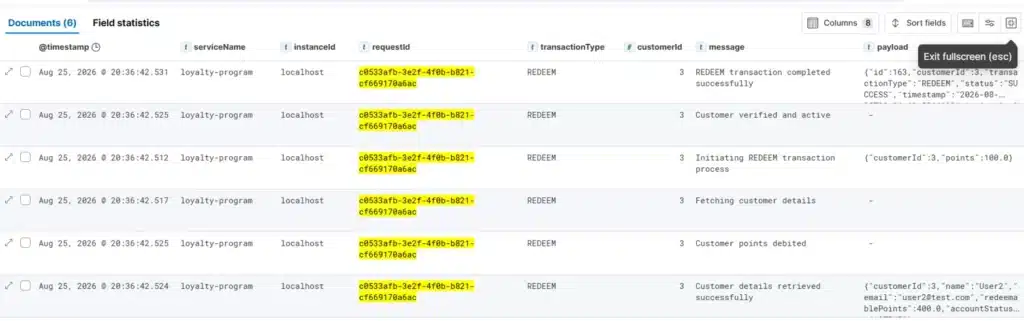
You can search by any field the same way — level: ERROR, customerId: 3, transactionType: REDEEM — and Kibana will filter live. From here, you can also set up alerts (e.g. notify on level: ERROR spikes) and build out full monitoring dashboards, but that’s a topic for another post.
And that’s the complete loop — application logs, shipped through Logstash, indexed in Elasticsearch, and searchable end-to-end in Kibana. This is how you setup ELK Stack in Docker.
Setup Loyalty Application on Your System
Want to try this yourself instead of just following along? You can spin up the entire pipeline — MySQL, the Loyalty Application, and the ELK Stack — on your own system in just a few steps.
Start by creating a folder on your system, set up the elk-network, and then set up Elasticsearch, Logstash, and Kibana exactly as covered above. Once that’s done, let’s add the database and the application itself.
Setup MySQL
Run the following command to spin up a MySQL container, attach it to elk-network, and automatically create the loyalty database:
This creates a MySQL container named mysql-container, attaches it to elk-network, and creates the loyalty database automatically.
To verify the database and tables, access the MySQL shell inside the container:
Verify MySQL Databasedocker exec -it mysql-container bash
# Log in to MySQL
mysql -uroot -proot
# Verify the database and tables
SHOW DATABASES;
USE loyalty;
SHOW TABLES;
Setup the Loyalty Application
With MySQL and ELK both up and attached to elk-network, let’s run the Loyalty Application itself:
This command pulls and runs the Loyalty Application image, connects it to your MySQL container by name, and mounts your elk-resource/logs folder — the same one Logstash is already watching — so your logs flow into the same pipeline instantly.
You can grab the complete Postman collection for the Loyalty Management API from GitHub, import it, and start hitting the Customer and Transaction APIs right away.
Conclusion
Setting up the ELK Stack in Docker is, honestly, the easy part — a handful of containers, a shared network, and a few volume mounts, and you’re up and running in minutes. The real work, and the real value, lies upstream of ELK entirely: in how well your application generates its logs.
The better and more structured the logs you generate, the better you’re able to search, filter, debug, and monitor your application end-to-end. A request ID, a transaction type, a service name — these small additions are what turn Elasticsearch and Kibana from a glorified text search into a genuine observability platform. Get your logging right, and ELK does the rest.


