In this blog, we’ll show you how to Dockerize a Spring Boot application with MySQL in just 7 easy steps. Dockerizing your app helps in managing dependencies, improving scalability, and ensuring that your code runs smoothly in different environments. We’ll walk through the process from building your app, running it in Docker containers, testing the APIs, and finally, pushing the Docker image to Docker Hub.
Why Dockerize a Spring Boot Application?
Dockerization is an excellent way to package your Spring Boot application and database into lightweight containers. This allows you to avoid the “it works on my machine” issue, ensuring your application runs identically across different environments. This tutorial covers the essential steps, from setting up the Docker network to testing your APIs.
Student Management Application
I have already created a detailed blog on how to build a REST API using Spring Boot and MySQL: Build REST API with Spring Boot, MySQL, and Docker. In this tutorial, we will take that same Student Management Application and Dockerize it.
Basic Description of the Application:
This is a Student Management System that provides a REST API to perform CRUD (Create, Read, Update, Delete) operations on student data. It uses Spring Boot for the backend and MySQL as the database.
Application Structure:
Before we start, let’s take a look at our project structure. In our project, we will have a Student model representing the data. Additionally, we will organize our application into different layers for better separation of concerns:
student-management
├── src
│ ├── main
│ │ ├── java
│ │ │ └── com
│ │ │ └── student
│ │ │ ├── model
│ │ │ │ └── Student.java
│ │ │ ├── dao
│ │ │ │ └── StudentRepository.java
│ │ │ ├── service
│ │ │ │ └── StudentService.java
│ │ │ └── controller
│ │ │ └── StudentController.java
│ │ └── resources
│ │ └── application.properties
└── pom.xml
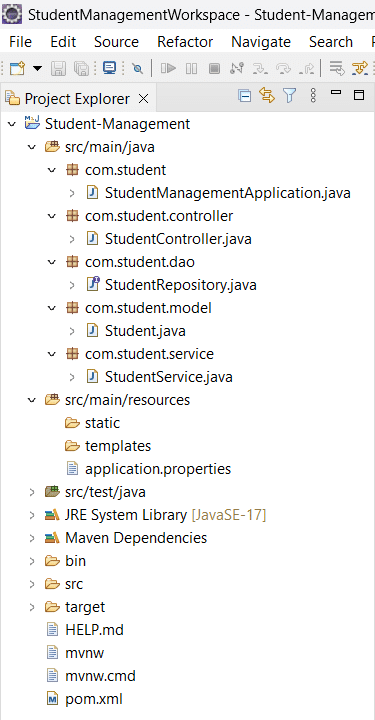
Explanation:
model: This package contains the
Studentclass, representing the student entity with relevant fields and annotations.dao: This package includes the
StudentRepositoryinterface for data access operations, extending Spring Data JPA’sJpaRepository.service: This package holds the
StudentServiceclass, which contains the business logic for managing student-related operations.controller: This package defines the
StudentControllerclass, which handles incoming HTTP requests and maps them to the service methods.resources: This directory includes the
application.propertiesfile for configuration settings, such as database connections.pom.xml: The Maven configuration file that manages dependencies and project settings.
Spring Boot: Application Behavior and Docker Integration
How Spring Boot Works Normally in an Applicatio
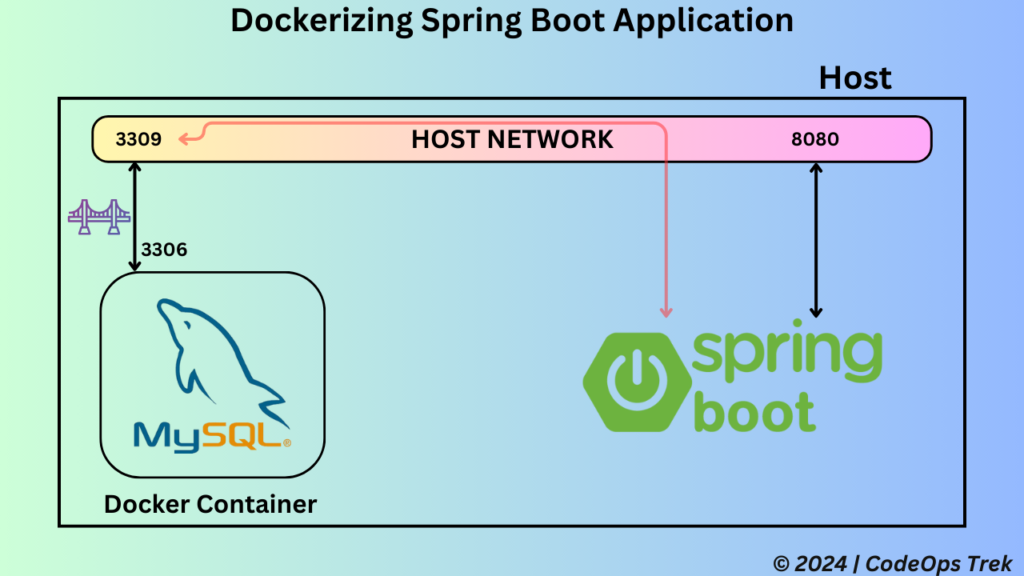
In a typical Spring Boot application setup, the application runs directly on the host machine and uses the host network to connect to external resources like the MySQL database. The application connects to the database via localhost or the host machine’s IP address. Here’s a basic overview:
- Application runs on the host system and interacts with the database.
- Database (e.g., MySQL) is installed on the same or a different machine, and the Spring Boot application connects to it through the host’s network.
How Spring Boot Works in Docker
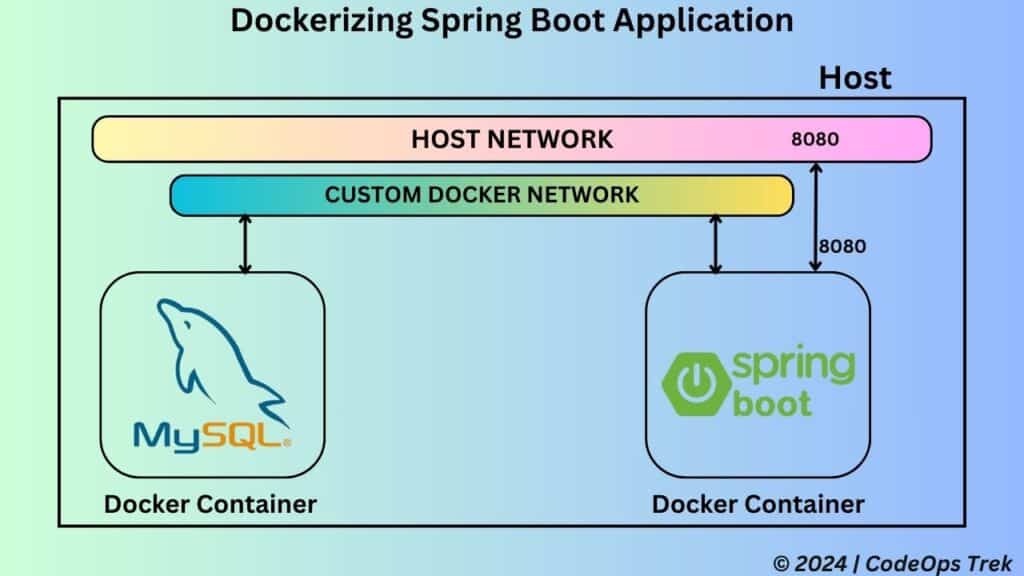
When Dockerizing the application, both the Spring Boot application and MySQL database are containerized. They no longer directly access the host network but communicate through a Docker network. Here’s how it works in Docker:
- Both the application container and database container are connected to the same Docker network.
- Instead of using localhost, the application will now use the container name (e.g.,
MysqlContainer) to connect to the MySQL database.
This approach provides isolation, and the containers can communicate internally within the Docker network, ensuring that they don’t rely on the host’s network directly.
Steps to Dockerize Your Application
Database Configuration Changes for Docker
In the Docker setup, the database connection string changes because both the application and database run inside Docker containers. Here’s how you configure the database in the application.properties file. You can find the complete code and structure in my GitHub repository.
# Database configuration
spring.datasource.driver-class-name = com.mysql.cj.jdbc.Driver

# Before Dockerization: Connect to the database on localhost
#spring.datasource.url = jdbc:mysql://localhost:3309/student_management

# After Dockerization: Connect to the database using the container name
spring.datasource.url = jdbc:mysql://MysqlContainer:3306/student_management
- spring.datasource.driver-class-name: Specifies the MySQL JDBC driver.
- spring.datasource.url: Connects to the MySQL database inside Docker using the container name
MysqlContainer.
Create a JAR File
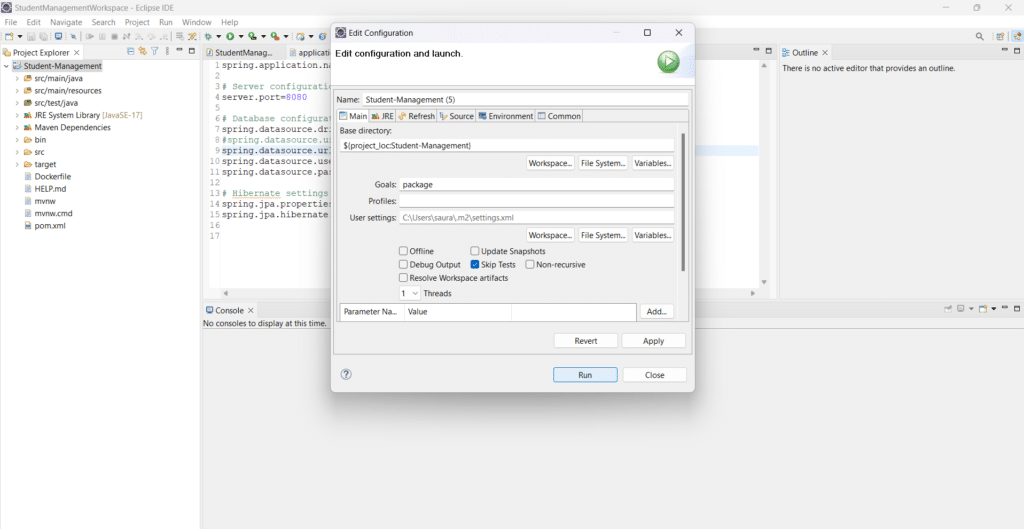
To package the Spring Boot application into an executable JAR file, follow these steps:
- Right-click on your Student Management project in Eclipse.
- Select Run As and then click on Maven build.
- In the configuration form that appears, type
packagein the Goals box (in lowercase). - Check the box to skip tests, then click Apply and Run.
Spring Boot will now download all the required dependencies and build an executable JAR file. Once the build is complete, the JAR file will be located inside the target folder.
Creat a Dockerfile for the Application
Next, we need to create a Dockerfile in the root directory of your Spring Boot application. This file contains the instructions for building the Docker image.
# Step 1: Use an official Java runtime as the base image
FROM openjdk:17-jdk-alpine

# Step 2: Set the working directory inside the container
WORKDIR /app

# Step 3: Copy the JAR file from the target folder to the working directory
COPY target/Student-Management-0.0.1-SNAPSHOT.jar Student-Management-0.0.1-SNAPSHOT.jar

# Step 4: Expose the port your application will run on
EXPOSE 8080

# Step 5: Specify the command to run the application
ENTRYPOINT ["java", "-jar", "Student-Management-0.0.1-SNAPSHOT.jar"]
Building the Docker Image for Spring Boot
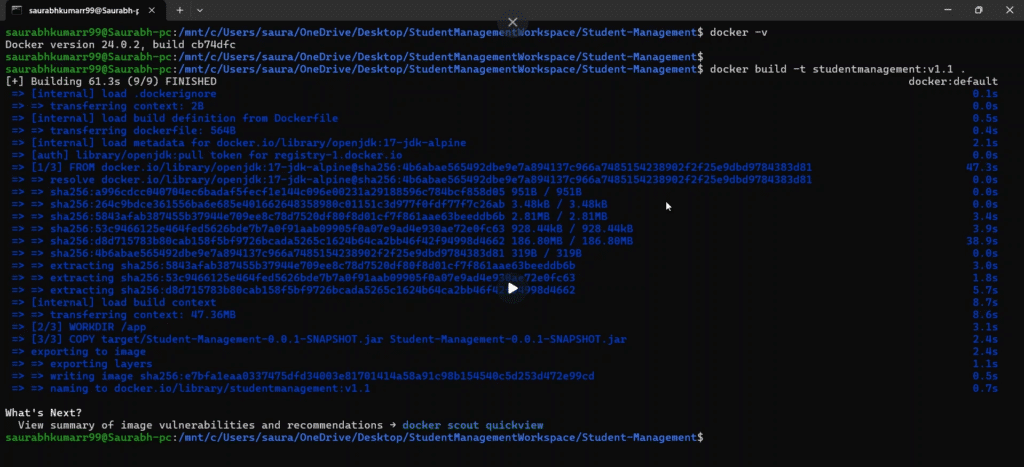
To finally create a Docker image for your Spring Boot application, navigate to the directory where your Dockerfile is located. Open your terminal in that directory, and run the following command:
docker build -t studentmanagement:v1.1 .
This command tells Docker to build an image using the instructions in the Dockerfile. The -t option is used to tag the image with a name and a version. In this case, the image is named studentmanagement, and v1.1 is the version tag. It’s important to note that Docker image names should be in lowercase to avoid any potential issues during deployment. The period (.) at the end of the command specifies the current directory as the build context, which includes the Dockerfile and any files needed for the image. After executing this command, Docker will process the Dockerfile and create your Docker image, which you can verify using the docker images command.
Running the Student Management Application in Docker
First, we need to create a custom Docker network to allow both the MySQL database and the Spring Boot application to communicate. Run the following command to create the network:
docker network create StudentManagementNetwork
You can verify that the network was created by listing all Docker networks:
docker network ls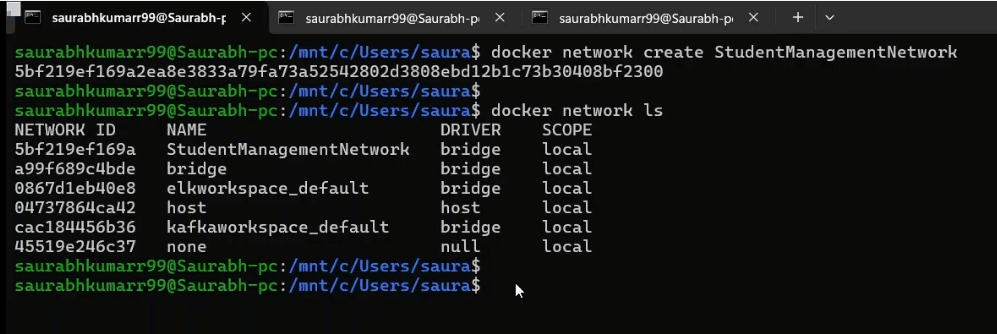
Next, we will run the MySQL database container and attach it to the StudentManagementNetwork. Use the following command:
docker run --name MysqlContainer --network StudentManagementNetwork -e MYSQL_ROOT_PASSWORD=root -e MYSQL_DATABASE=student_management -d mysql:latest
This will start the MySQL container in detached mode.

Finally, we will run our Spring Boot application container in the same network, exposing it on port 8080:
docker run --name StudentManagementApp --network StudentManagementNetwork -it -p 8080:8080 studentmanagement:v1.1
This command runs the application in interactive mode (-it), binds the host’s port 8080 to the container’s port 8080, and attaches the container to the StudentManagementNetwork.
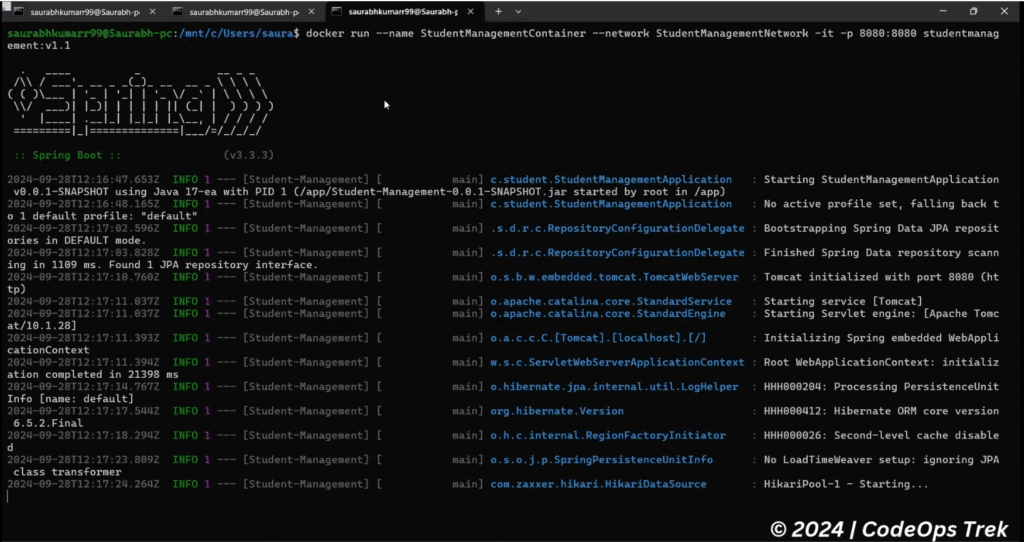
To check the network and ensure that the container is attached, you can inspect the Docker network:
docker network inspect StudentManagementNetwork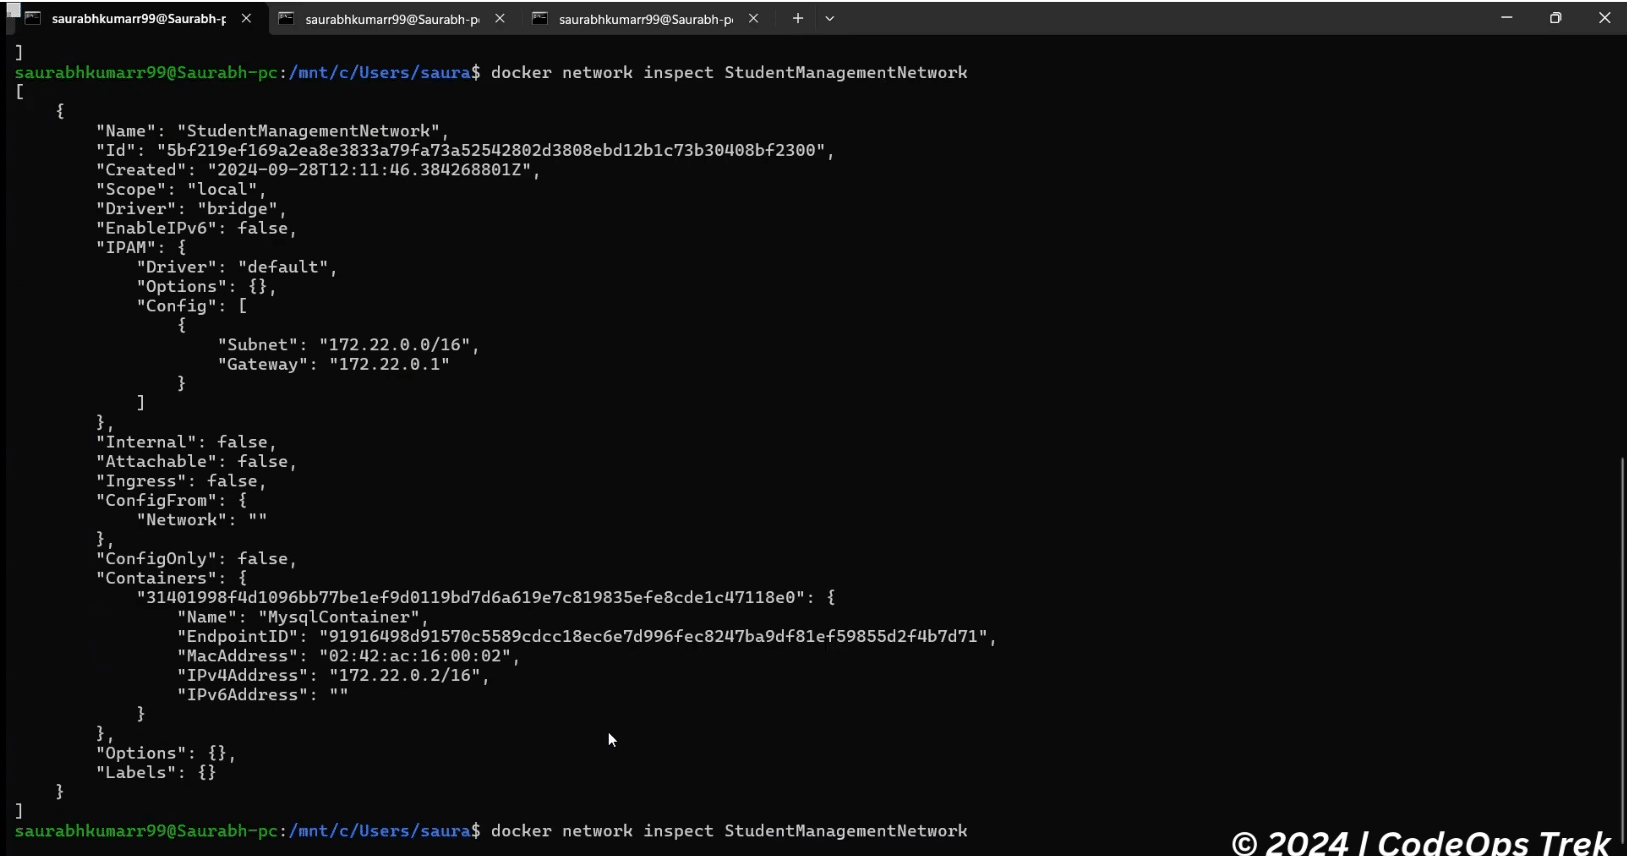
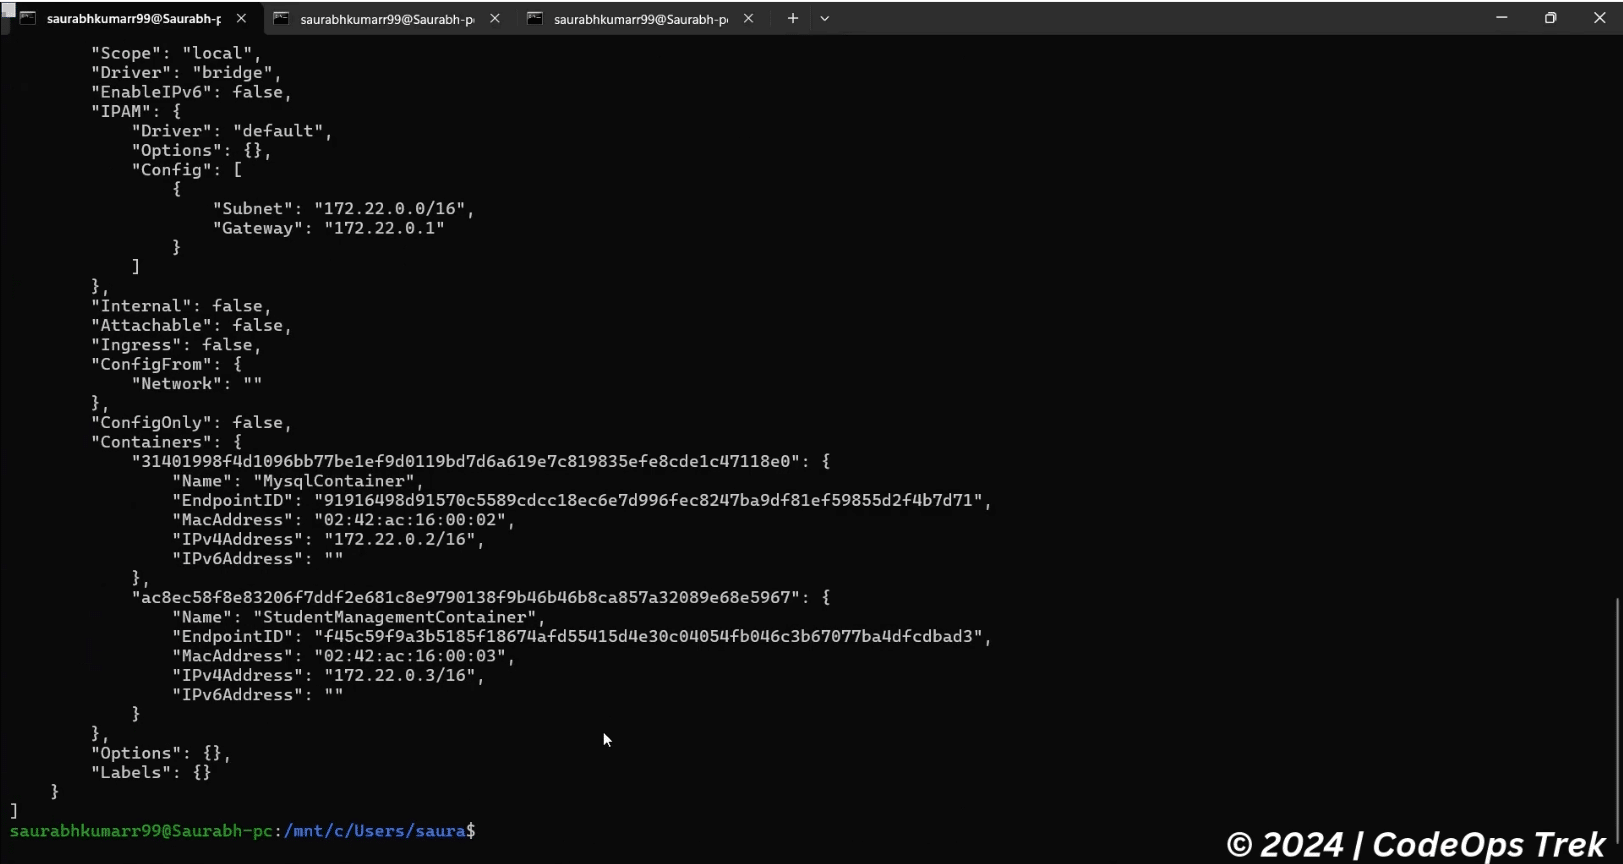
This is how we’ve successfully set up and run the Student Management application in Docker, connecting it with the MySQL database and ensuring both services operate within the same Docker network for seamless communication.
Pushing Your Docker Image to Docker Hub
username/image. For example, to tag your image, you would use the following command:
docker tag studentmanagement:v1.1 codeopstrek/studentmanagement:v1.1
docker push codeopstrek/studentmanagement:v1.1
docker pull codeopstrek/studentmanagement

Conclusion
In this tutorial, we successfully dockerized our Spring Boot application, demonstrating how to set up, run, and push it to Docker Hub. By following these steps, you can streamline the deployment process of your applications, ensuring they are easily portable and scalable. Docker not only simplifies the management of dependencies but also enhances the overall efficiency of application deployment.
For more in-depth information on using Spring Boot with Docker, you can check out the official Spring guide here. Thank you for following along, and happy coding!
