Building a REST API from scratch can seem daunting, but with Spring Boot, MySQL, and Docker, the process becomes much easier and more efficient. In this comprehensive guide, we’ll walk you through setting up a Spring Boot application step by step and configuring a MySQL database inside a Docker container. We’ll also test the API using Postman to ensure everything works as expected. This approach allows for seamless database management and deployment using Docker.
A REST API (Representational State Transfer Application Programming Interface) is a web service that uses HTTP requests to interact with resources. REST APIs follow the principles of REST architecture, which ensures that the system is stateless and can communicate effectively using standard HTTP methods such as GET, POST, PUT, and DELETE.
In REST, resources are typically represented by URIs (Uniform Resource Identifiers) and are manipulated by performing operations on these URIs through the API.
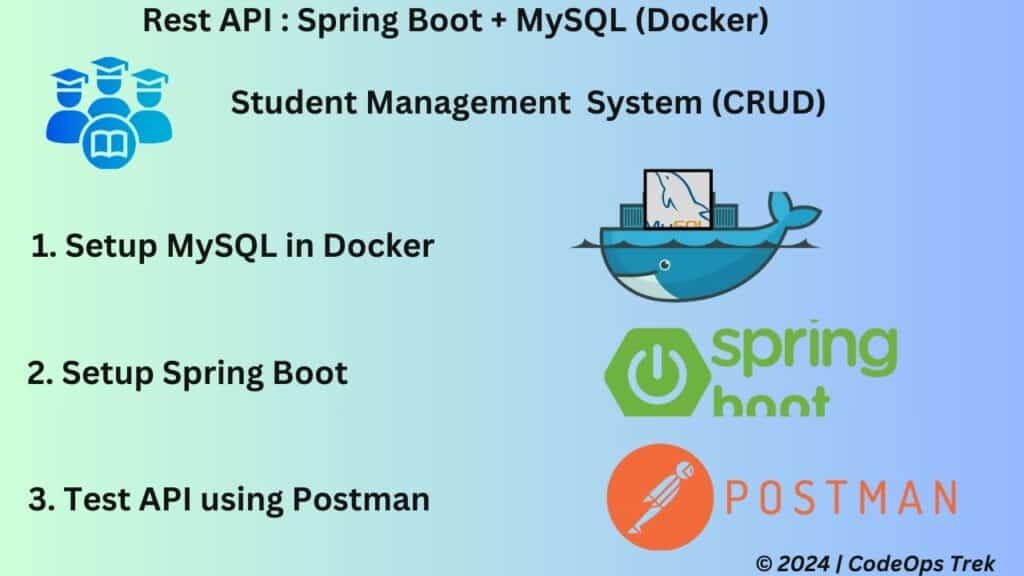
Creating a REST API can seem complex, but by breaking it down into broader steps, the process becomes much easier. We will structure our approach into three main steps:
Set Up MySQL in Docker
We will begin by setting up MySQL in a Docker container. This allows us to run the database in an isolated environment, making it easy to manage and deploy.Create REST API with Spring Boot
Next, we will develop the REST API using Spring Boot. This step involves configuring our application, creating the necessary entities and repositories, and defining the API endpoints.Test the API with Postman
Finally, we will use Postman to test our API endpoints. This will ensure that our API functions correctly and meets the requirements.
Now, let’s start with the first step: setting up MySQL in Docker.
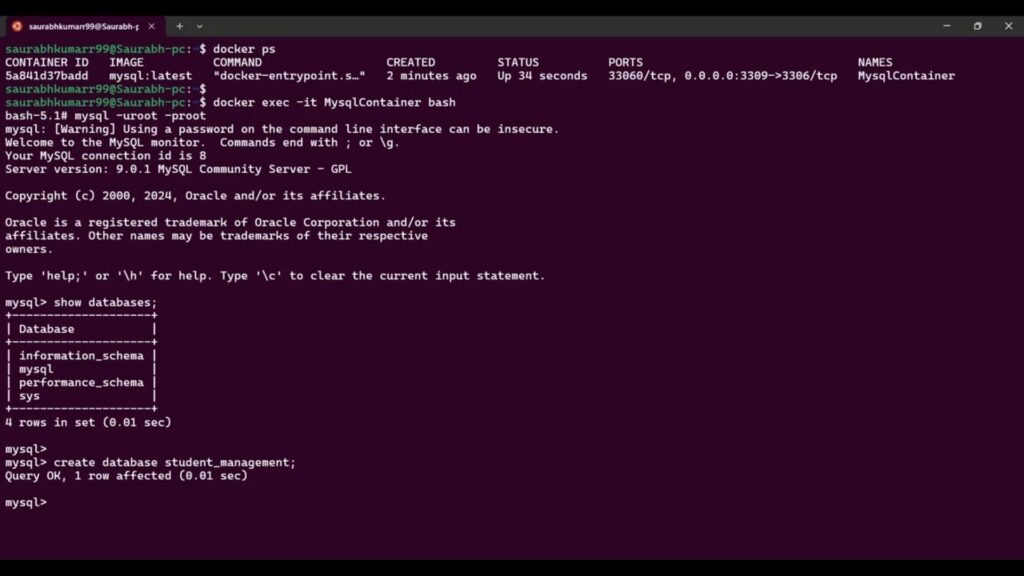
To set up MySQL in Docker, follow these commands:
1. Check Docker Installation:
Verify that Docker is installed on your machine by running:
docker --version
2. Pull MySQL Docker Image:
Download the latest MySQL image from Docker Hub:
docker pull mysql:latest
3. Run MySQL Docker Container:
Start a MySQL container with port mapping. We will map MySQL’s default port (3306) to port 3309 on your host machine:
docker run --name MysqlContainer -e MYSQL_ROOT_PASSWORD=root -p 3309:3306 -d mysql:latest
4. Access the MySQL Container:
After the container is running, you can access its shell:
docker exec -it MysqlContainer bash
5. Create Database Inside Container:
Enter the MySQL CLI by running:
mysql -uroot -proot
CREATE DATABASE student_management;
SHOW DATABASES;
Enter the root password (root), then create a new database.
With MySQL successfully set up in Docker, we can now move on to the next step: creating a REST API with Spring Boot.
Create Spring Boot Project
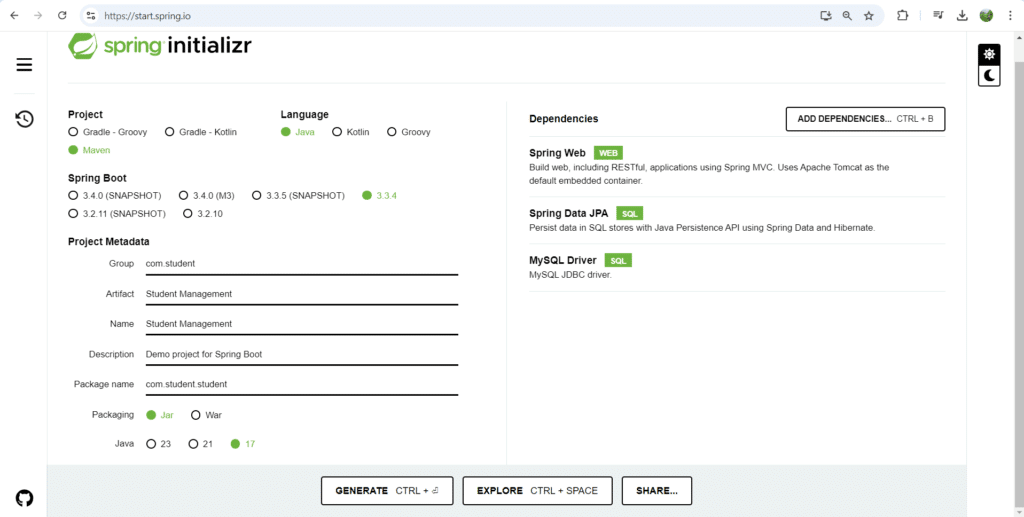
To set up our REST API, we’ll begin by creating a Spring Boot project using Spring Initializr.
- Head over to Spring Initializr: Visit https://start.spring.io/.
- Select Project Metadata:
- Language: Java
- Build: Maven
- Group:
com.student - Artifact:
StudentManagement - Name:
StudentManagement - Package Name:
com.student
- Select Dependencies:
- Spring Web
- Spring Data JPA
- MySQL Driver
- Download the Project: Click the “Generate” button to download your Spring Boot project as a ZIP file.
Import Project into Eclipse
- Create a Workspace: Open Eclipse and create a new workspace or use an existing one.
- Import the Project:
- Navigate to
File>Import. - Select
Existing Maven Projectsand browse to the downloaded ZIP file. - Click
Finishto import your project.
- Navigate to
Project Structure Overview
Before we start, let’s take a look at our project structure. In our project, we will have a Student model representing the data. Additionally, we will organize our application into different layers for better separation of concerns:
- DAO Layer: This layer will handle database operations, interacting directly with the MySQL database.
- Service Layer: This layer will contain the business logic of our application, coordinating between the DAO and Controller layers.
- Controller Layer: This layer will manage incoming HTTP requests and map them to the appropriate service methods, acting as the entry point for the client to interact with our application.
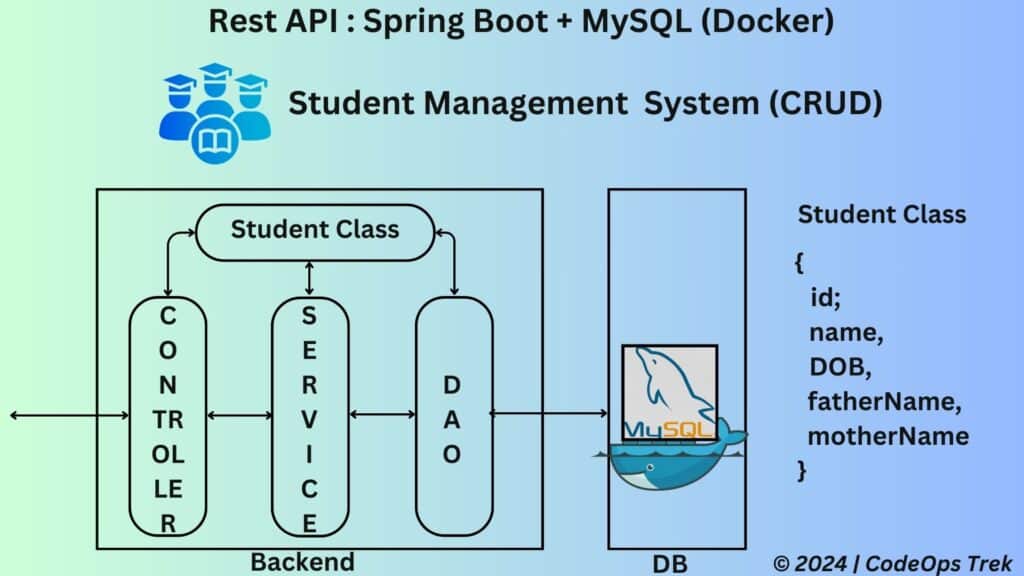
This structure ensures that our code is organized and maintainable, making it easier to implement and test our features.
student-management
├── src
│ ├── main
│ │ ├── java
│ │ │ └── com
│ │ │ └── student
│ │ │ ├── model
│ │ │ │ └── Student.java
│ │ │ ├── dao
│ │ │ │ └── StudentRepository.java
│ │ │ ├── service
│ │ │ │ └── StudentService.java
│ │ │ └── controller
│ │ │ └── StudentController.java
│ │ └── resources
│ │ └── application.properties
└── pom.xml
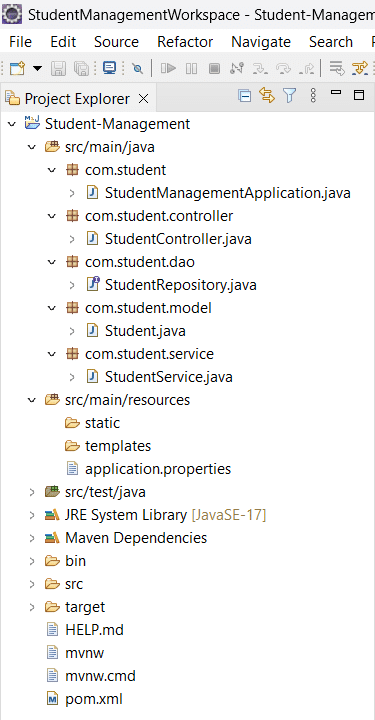
Explanation:
model: This package contains the
Studentclass, representing the student entity with relevant fields and annotations.dao: This package includes the
StudentRepositoryinterface for data access operations, extending Spring Data JPA’sJpaRepository.service: This package holds the
StudentServiceclass, which contains the business logic for managing student-related operations.controller: This package defines the
StudentControllerclass, which handles incoming HTTP requests and maps them to the service methods.resources: This directory includes the
application.propertiesfile for configuration settings, such as database connections.pom.xml: The Maven configuration file that manages dependencies and project settings.
Create the Application Components
Create the Student Class
Now, let’s start by creating the Student class, which will serve as our model. This class will represent the structure of a student in our application and will include attributes such as id, name, email, and age.
Student
package com.student.model;

import jakarta.persistence.Entity;
import jakarta.persistence.GeneratedValue;
import jakarta.persistence.GenerationType;
import jakarta.persistence.Id;

@Entity
public class Student {

    @Id
    @GeneratedValue(strategy = GenerationType.AUTO)
    private int id;

    private String name;
    private String DOB;
    private String fatherName;
    private String motherName;

    public Student() {
        super();
        // TODO Auto-generated constructor stub
    }

    public Student(int id, String name, String dOB, String fatherName, String motherName) {
        super();
        this.id = id;
        this.name = name;
        this.DOB = dOB;
        this.fatherName = fatherName;
        this.motherName = motherName;
    }

    // Getters & Setters
    public int getId() {
        return id;
    }

    public void setId(int id) {
        this.id = id;
    }

    public String getName() {
        return name;
    }

    public void setName(String name) {
        this.name = name;
    }

    public String getDOB() {
        return DOB;
    }

    public void setDOB(String dOB) {
        DOB = dOB;
    }

    public String getFatherName() {
        return fatherName;
    }

    public void setFatherName(String fatherName) {
        this.fatherName = fatherName;
    }

    public String getMotherName() {
        return motherName;
    }

    public void setMotherName(String motherName) {
        this.motherName = motherName;
    }

    @Override
    public String toString() {
        return "Student [id=" + id + ", name=" + name + ", DOB=" + DOB +
               ", fatherName=" + fatherName + ", motherName=" + motherName + "]";
    }
}
Create the Student Repository Interface
Next, let’s create the StudentRepository interface. This interface will handle database operations related to the Student entity. By extending JpaRepository, we gain access to various methods for CRUD operations without needing to implement them ourselves. The StudentRepository will use Student as the entity type and Integer as the type of the entity’s identifier. This setup allows us to easily perform database interactions while adhering to Spring Data JPA conventions.
StudentRepository
package com.student.dao;

import org.springframework.data.jpa.repository.JpaRepository;
import com.student.model.Student;

public interface StudentRepository extends JpaRepository< Student, Integer> {
}
Create the Student Service Class
Now, let’s move on to creating the StudentService class. This class will act as an intermediary between the controller and the repository. It will encapsulate the business logic related to student operations, such as saving, retrieving, updating, and deleting student records. By using a service layer, we maintain a clean separation of concerns, making our application easier to manage and test.
StudentService
package com.student.service;

import org.springframework.beans.factory.annotation.Autowired;
import org.springframework.stereotype.Service;
import java.util.List;
import com.student.dao.StudentRepository;
import com.student.model.Student;

@Service
// Indicates that this class is a service component in the Spring context
public class StudentService {

    @Autowired
// Automatically injects the StudentRepository bean
    private StudentRepository studentRepository;

    // Fetches all students from the database
    public List getAllStudents() {
        return studentRepository.findAll();
    }

    // Saves a new student record to the database
    public Student saveStudent(Student student) {
        return studentRepository.save(student);
    }

    // Retrieves a student by their ID; returns null if not found
    public Student getStudentById(int id) {
        return studentRepository.findById(id).orElse(null);
    }

    // Deletes a student record by ID
    public void deleteStudent(int id) {
        studentRepository.deleteById(id);
    }

    // Updates an existing student record
    public Student updateStudent(Student student) {
        return studentRepository.save(student);
    }
}
Create the Student Controller Class
Now, let’s move on to creating the StudentController class. This class will serve as the entry point for our REST API, handling incoming HTTP requests related to student operations. It will define endpoints for actions such as retrieving all students, saving a new student, updating existing records, and deleting students by ID.
By using a controller, we can efficiently manage the flow of data between the client and the service layer, ensuring that requests are appropriately handled and responses are returned in a structured format. This design promotes a clear separation of concerns, making our application easier to maintain and extend.
StudentController
package com.student.controller;

import org.springframework.beans.factory.annotation.Autowired;
import org.springframework.http.ResponseEntity;
import org.springframework.web.bind.annotation.*;
import java.util.List;
import com.student.model.Student;
import com.student.service.StudentService;

@RestController // Indicates that this class is a REST controller
@RequestMapping("/studentservice") // Base URL for all student-related endpoints
public class StudentController {

    @Autowired // Automatically injects the StudentService bean
    private StudentService studentService;

    // Endpoint to get all students
    @GetMapping("/getAllStudents")
    public List getAllStudents() {
        return studentService.getAllStudents();
    }

    // Endpoint to save a new student
    @PostMapping("/saveStudent")
    public ResponseEntity saveStudent(@RequestBody Student student) {
        Student savedStudent = studentService.saveStudent(student);
        return ResponseEntity.ok(savedStudent); // Returns the saved student
    }

    // Endpoint to get a student by ID
    @GetMapping("/getStudentById/{id}")
    public ResponseEntity getStudentById(@PathVariable int id) {
        Student student = studentService.getStudentById(id);
        if (student != null) {
            return ResponseEntity.ok(student); // Returns the found student
        } else {
            return ResponseEntity.notFound().build(); // Returns 404 if not found
        }
    }

    // Endpoint to update an existing student
    @PutMapping("/updateStudent")
    public ResponseEntity updateStudent(@RequestBody Student student) {
        Student updatedStudent = studentService.updateStudent(student);
        return ResponseEntity.ok(updatedStudent); // Returns the updated student
    }

    // Endpoint to delete a student by ID
    @DeleteMapping("/deleteStudentById/{id}")
    public ResponseEntity deleteStudent(@PathVariable int id) {
        studentService.deleteStudent(id);
        return ResponseEntity.noContent().build(); // Returns 204 No Content
    }
}
application.properties
spring.application.name=Student-Management

# Server configuration
server.port=8080

# Database configuration
spring.datasource.driver-class-name = com.mysql.cj.jdbc.Driver
spring.datasource.url = jdbc:mysql://localhost:3309/student_management
spring.datasource.username = root
spring.datasource.password = root

# Hibernate settings
spring.jpa.properties.hibernate.dialect = org.hibernate.dialect.MySQL8Dialect
spring.jpa.hibernate.ddl-auto = update
Start the Application and Verify Table Creation
Now that we have set up our model, repository, service, and controller, it’s time to start the application. Once the application is running, we will check whether the student table has been created in the MySQL database. This verification ensures that our Spring Boot application is correctly connected to the database and is functioning as expected.


In this final step, we’ll use Postman to test our REST API for basic CRUD (Create, Read, Update, Delete) operations on the Student resource. We’ll create a new collection in Postman for organizing our API requests and ensure the API is functioning properly.
Here are the URLs for testing CRUD operations with Postman:
Create a New Student (POST):
http://localhost:8080/studentsRetrieve All Students (GET):
http://localhost:8080/studentsRetrieve a Student by ID (GET):
http://localhost:8080/students/{id}Update a Student (PUT):
http://localhost:8080/students/{id}Delete a Student (DELETE):
http://localhost:8080/students/{id}
Replace {id} with the actual student ID for GET, PUT, and DELETE requests.


In this step-by-step guide, we have successfully built a REST API using Spring Boot and MySQL, and set up MySQL in Docker to ensure seamless deployment and testing. We started by configuring MySQL, then moved on to creating the Spring Boot project, building the REST API, and finally, testing it using Postman. With this approach, you can easily manage and scale your database-backed applications.
Checkout Code on Github: Student Management
To explore further, you might want to dive into related topics:
- Learn more about Docker in my blog post: A Comprehensive Guide to Docker
- Understand how microservices work by reading: What is Microservices Architecture?
By implementing REST APIs with Spring Boot and containerizing your environment using Docker, you’re on the path to creating efficient, scalable, and maintainable applications.
If you’re new to REST APIs and would like to understand the concept better, check out this external resource: What is a REST API?

Great post. I used to be checking constantly this weblog and I’m inspired!
Extremely useful info particularly the final phase 🙂 I deal
with such information much. I used to be looking for this particular information for a
very long time. Thanks and best of luck.